You spend your week serving clients, running programs, doing the actual work the grants fund. Your timesheet isn't your job — it's the paperwork standing between you and getting paid. This guide gets you in, gets your hours logged, gets you signed out, and gets out of your way.
This guide assumes your base role is Staff. If you also approve other people's timesheets, see the Approver guide for the queue side of the workflow.
Getting started
Your Admin invites you by email. Open the email and click Accept invitation. You'll land on a setup page at your workspace — your-org.hoursatwork.com/invite/... — where you set a password (at least twelve characters; use a passphrase you can remember) and optionally tweak your display name. That display name is what shows on your timesheets and on the signed PDFs your approver signs.
After accepting, you land on the sign-in page for your workspace. Sign in with your email and the password you just set. Bookmark your-org.hoursatwork.com now — you'll come back every week.
The first thing you'll see after signing in is My timesheet for this week.
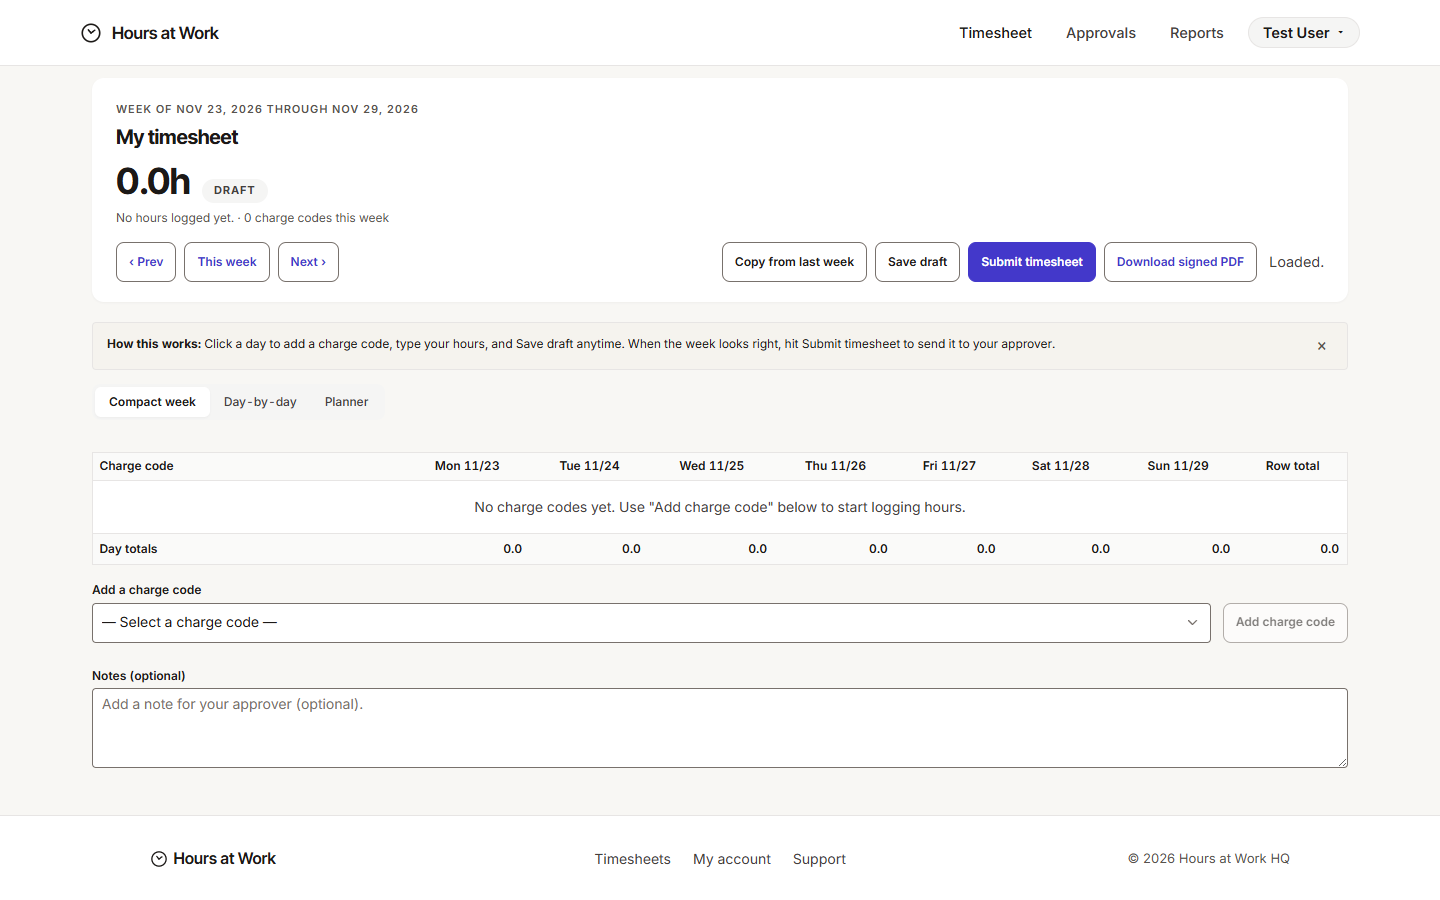
That's your home base. Three navigation items sit at the top:
- Timesheet — your weekly grid. This is where you live.
- Approvals — only visible if you're also an Approver.
- Reports — only visible if your Admin has granted you a Fiscal Analyst or HR Analyst Access add-on.
Take a second to read the column headers across the grid — Mon 11/23, Tue 11/24, Wed 11/25 … That's your work week. Your Admin sets which day starts the week (Monday or Sunday) at the workspace level, so every staff member sees the same boundaries. Whatever you see in those headers is the seven-day window you'll log against.
Why this matters. Hours at Work is built around the weekly timesheet — one week, one staff member, one submission. Funders that pay your nonprofit want time tracked at the same cadence payroll runs, so the work-week boundary is intentionally inflexible. Knowing where your week starts and ends keeps you from logging Thursday's outreach visit against the wrong week.
One workspace policy to know. Your workspace may set a Submission deadline — the number of business days after a pay period ends by which you have to submit. Ask your Admin what yours is; it's a workspace-wide rule, not a per-person one.
Daily workflow
Most days you'll spend two or three minutes in here. Open the Timesheet tab, log the day, save, close the tab. Same flow every time.
Add the charge codes you need
Below the grid is an Add a charge code combobox grouped by kind — Admin, Grant, Leave. Open it, pick the code that matches the work, and click Add charge code. The button stays disabled until you pick a real option, which is intentional — it stops you from adding an empty row by accident.
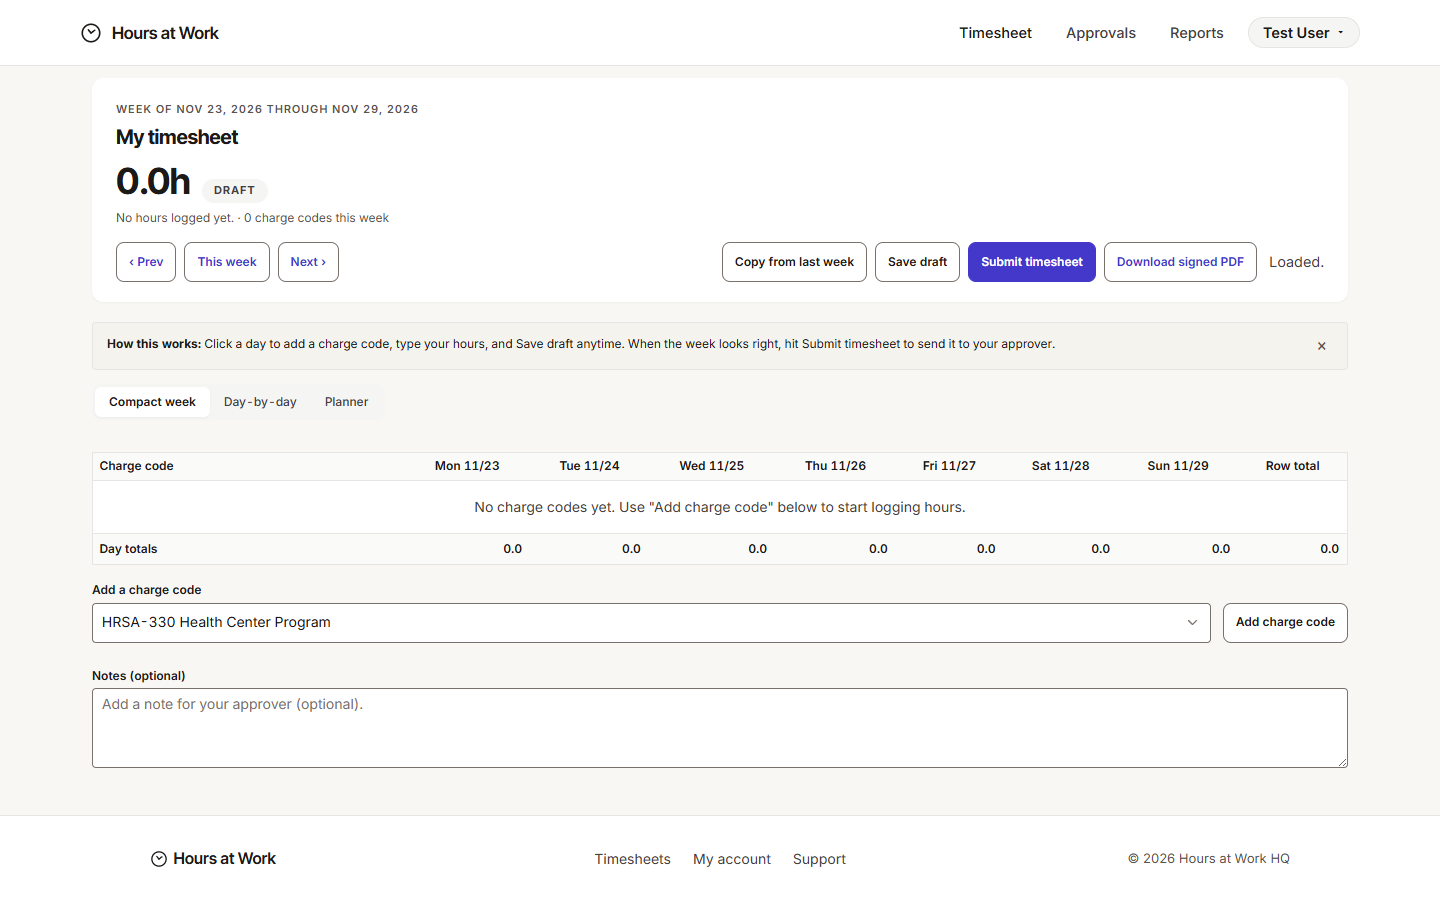
A new row appears in the grid with the charge code name on the left, a kind badge (ADMIN / GRANT / LEAVE), and an hours field for each day of the week. Add as many rows as you need — typical weeks have two to four. Keep going until every kind of work you did this week has its own row.
Why this matters. Every hour you log against a Grant-kind charge code is an hour your nonprofit can bill back to that funder. Getting the codes right at this step — before you type a single number — is what makes the rest accurate. If a code you need isn't in the list, your Admin hasn't added it yet. Ask them.
Type your hours
For each day, type hours into the cell for the matching charge code. Use decimals — 2.5 means two and a half hours, 0.25 means fifteen minutes. Tab moves you across the row; click any cell to jump.
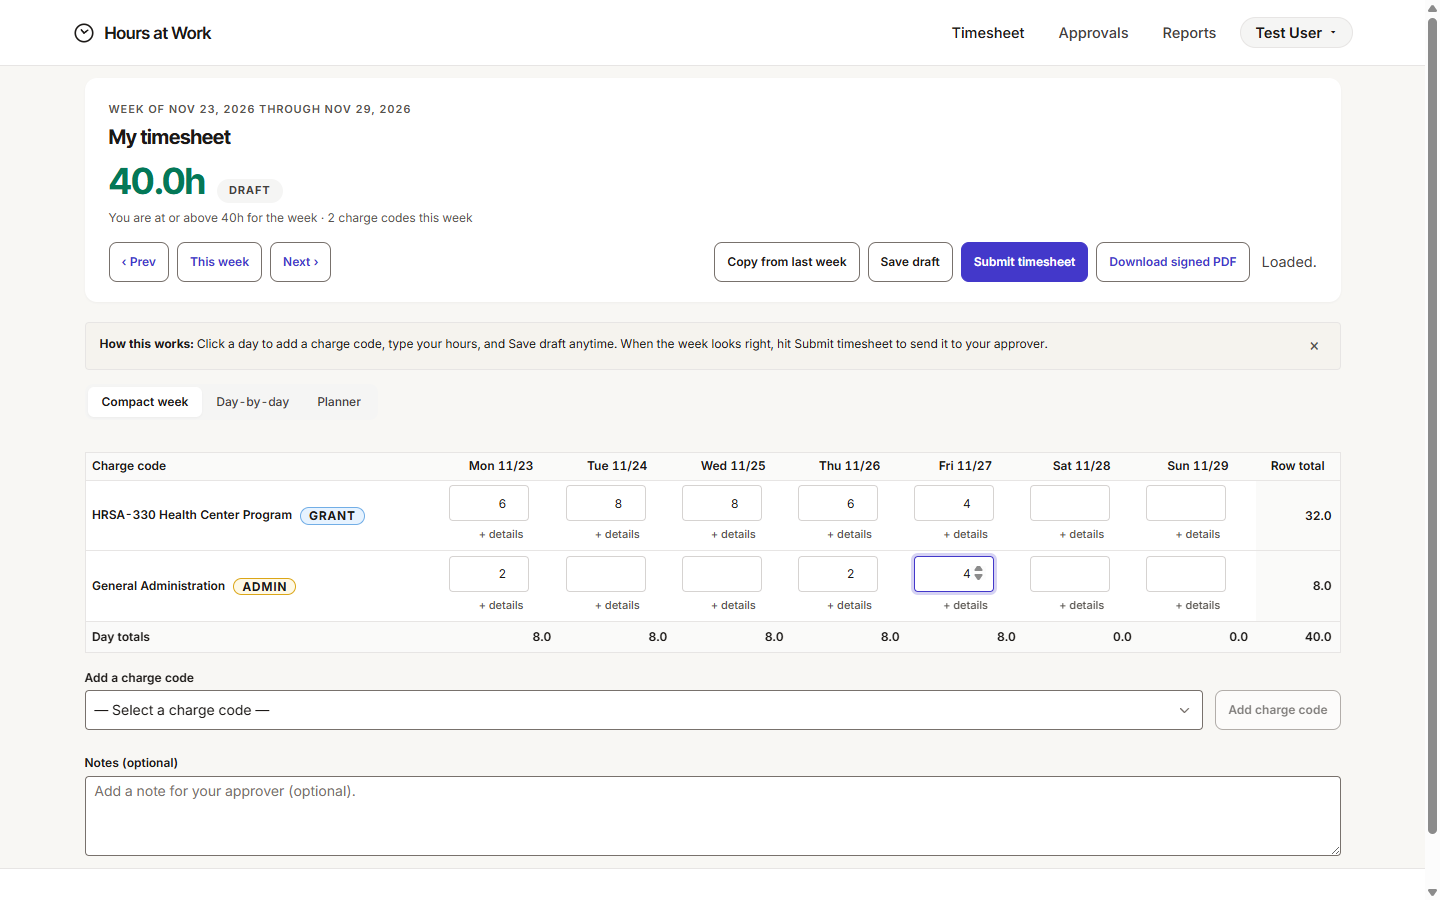
As you type, three things update on the fly:
- Row total on the right of each row — that charge code's hours for the week.
- Day totals along the bottom — every code added together for each day.
- The big number at the top — your week-total hours, with a status pill next to it (DRAFT until you submit).
Why this matters. The bottom row and the right column are your two reconciliation lanes. If Wednesday's column shows 9.5 and you only worked eight hours that day, you'll see the mismatch before your approver does. The grand total tells you whether you're hitting the hours you're expected to hit — most full-time staff land between 36 and 40.
Optional — pick a different view
The three tabs above the grid switch how the same week is shown:
- Compact week — the default. One row per charge code, one column per day. Best on a desktop.
- Day-by-day — one day at a time, with start/end clock fields and a lunch range if you'd rather log shifts than totals. Best on a phone.
- Planner — a card-per-day view that's useful if your week follows a recurring pattern (Tuesdays and Thursdays are always client visits, for instance).
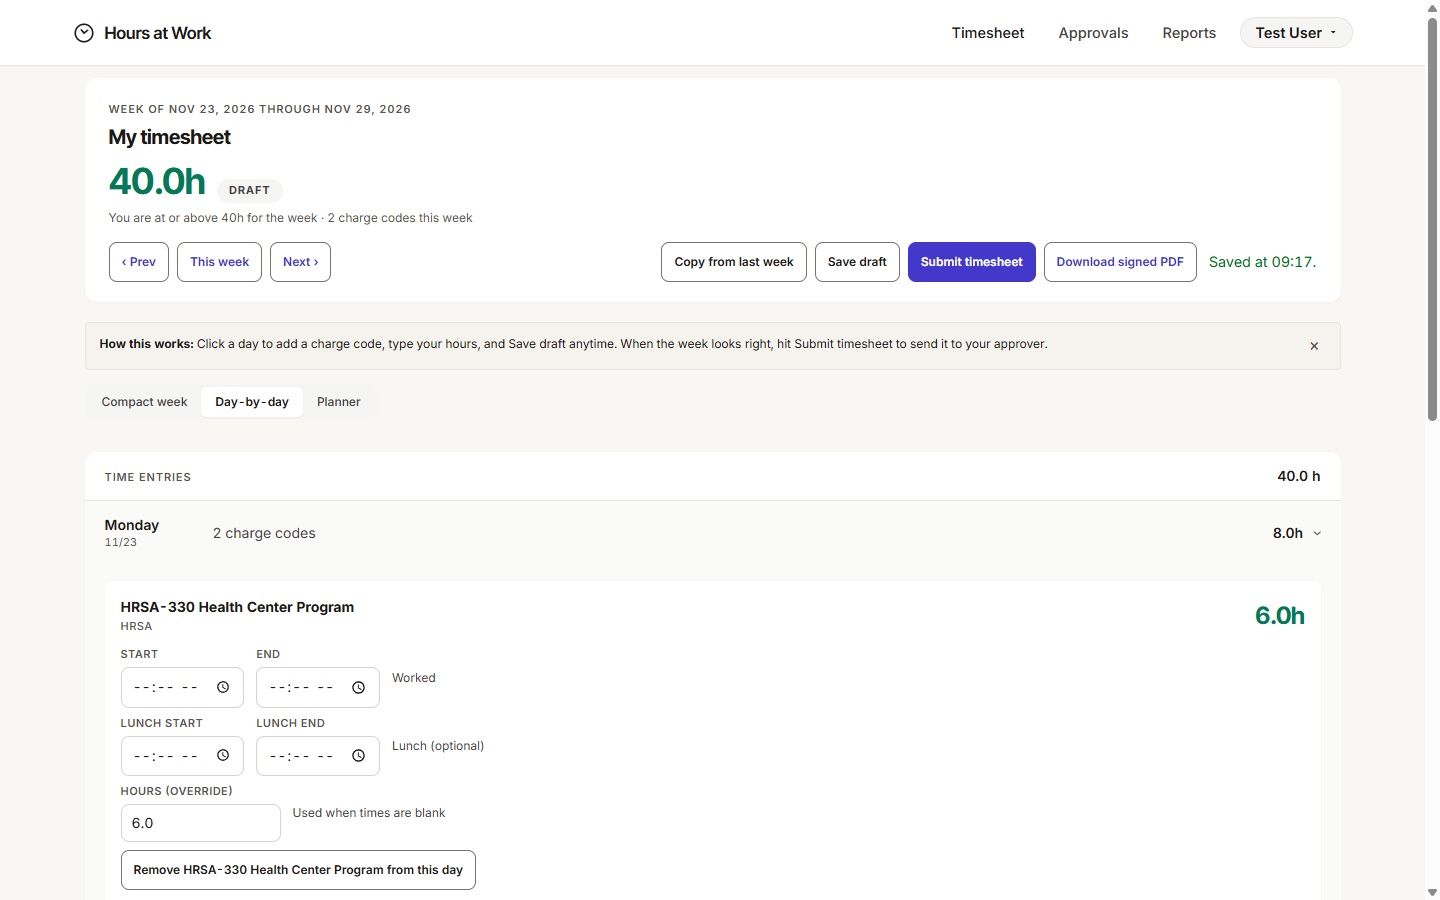
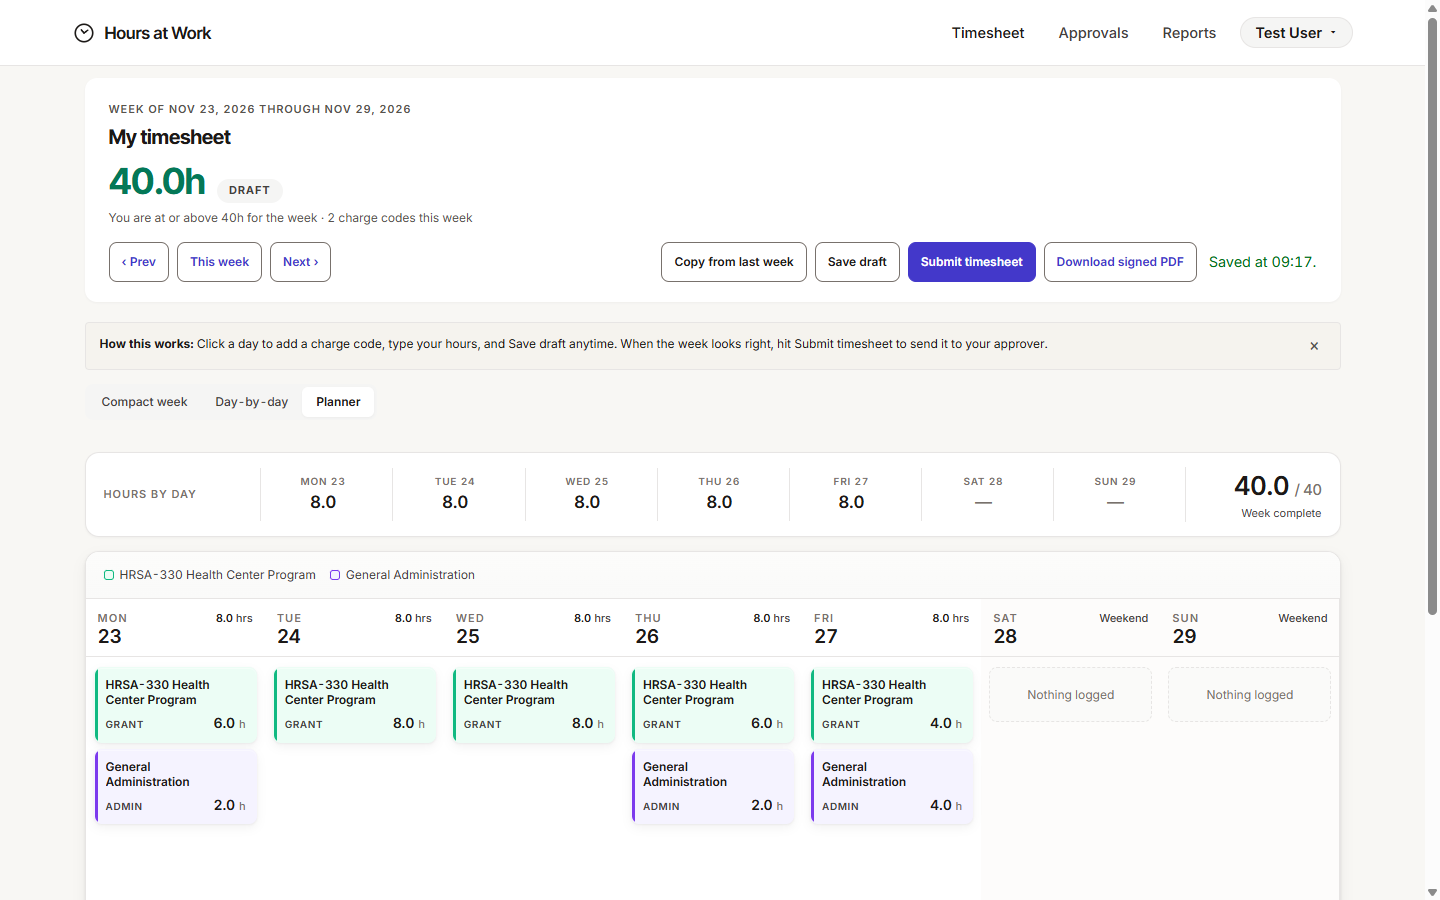
Use whichever fits your day. Switching views doesn't change your data — the same hours show up everywhere.
Add a note for your approver (optional)
Below the grid is a Notes (optional) field. If anything about this week needs context — a conference, a sick day, a charge-code change mid-week — write it here so your approver doesn't have to come ask.
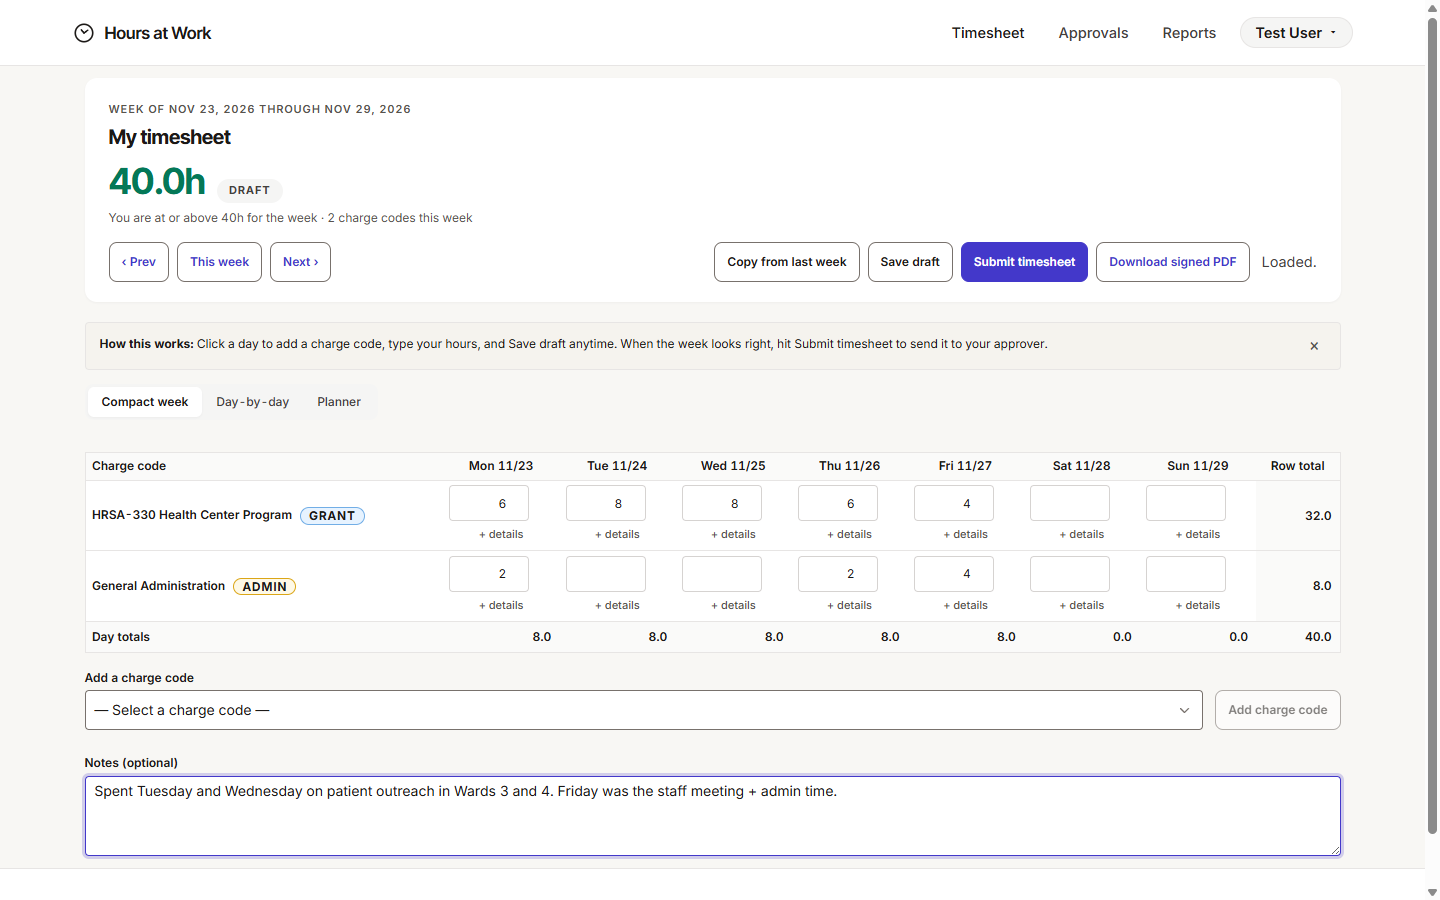
Notes ride with the timesheet through approval and end up on the signed PDF. Keep them short and factual.
Why this matters. A two-line note up front beats a back-and-forth email later. Your approver scans the queue quickly — the note is what tells them whether to sign or to ask.
Save your draft
Click Save draft at any time. The button enables the moment you have something to save and shows a small "Saved at 09:17" confirmation next to it. Saving doesn't submit anything — it just stashes your work so you can come back. The timesheet stays in DRAFT until you submit.
You can save as often as you want. There's no penalty for saving an in-progress week, and it's the only way to be sure you won't lose what you typed if your laptop goes to sleep.
Periodic tasks
The rhythm of a working week is: log a little each day, review at the end, submit.
End of the week — submit
When the week is done and the grid looks right, click Submit timesheet. A signature dialog opens.
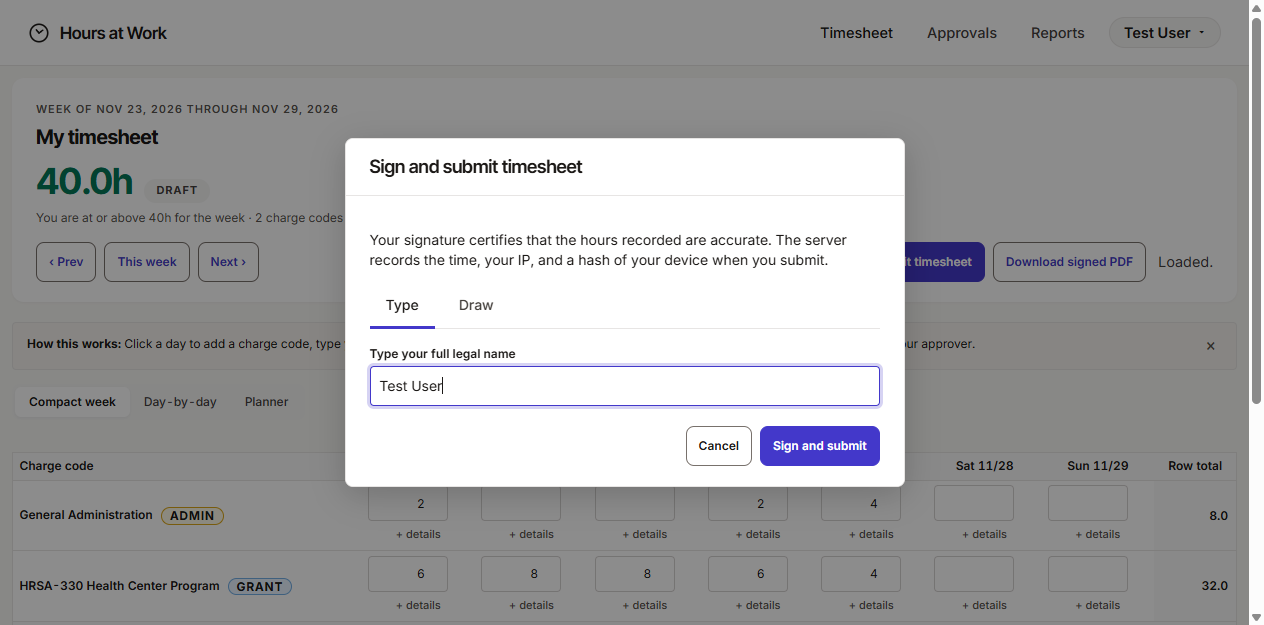
You can Type your full legal name or Draw your signature with a mouse or touchscreen. Either is legally binding. Click Sign and submit.
The status flips to SUBMITTED, a banner appears — Submitted — awaiting approval. The grid is read-only until your approver decides — and the Save draft button greys out. You can still see the week, just not edit it.
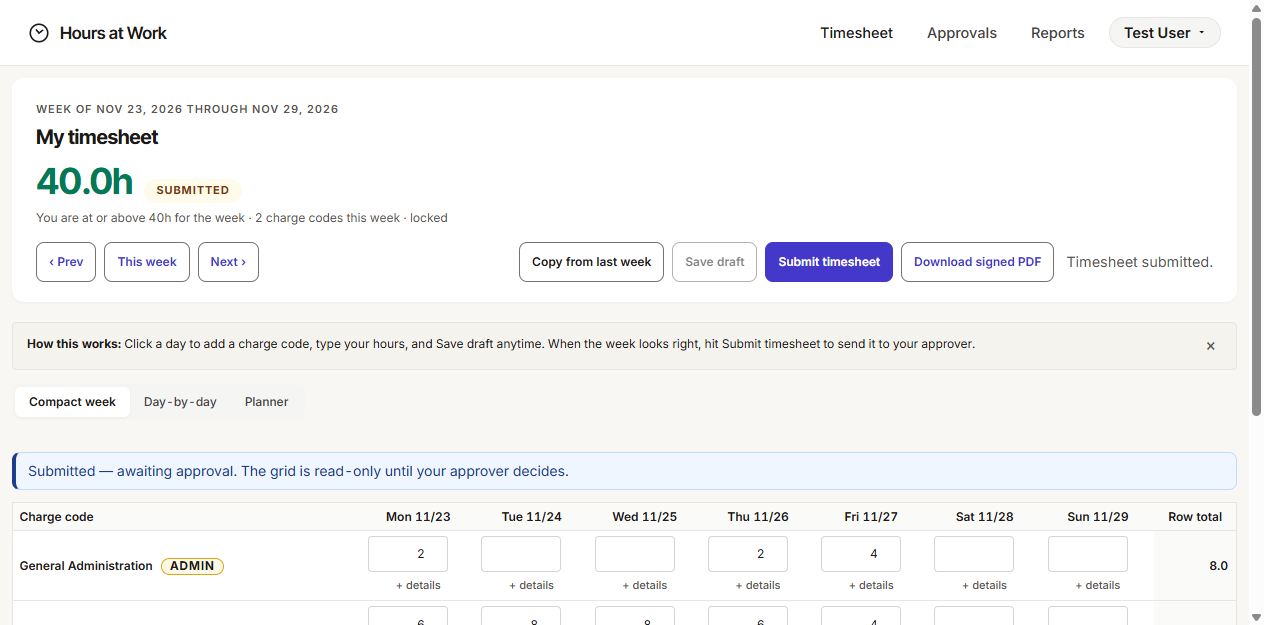
Why this matters. Submitting is the formal handoff. Your signature certifies the hours are accurate; your approver's signature, when it comes, certifies they reviewed and accepted them. Together those two signatures are what makes a Signed PDF an audit-ready artifact a funder will accept. Don't submit a week you haven't actually checked.
After approval — keep your own copy
Once your approver signs off, the Download signed PDF link at the top of the page becomes a real download. The PDF carries the hours table, both signatures, the timestamp, your IP, and a device hash — everything an auditor would ask to see.
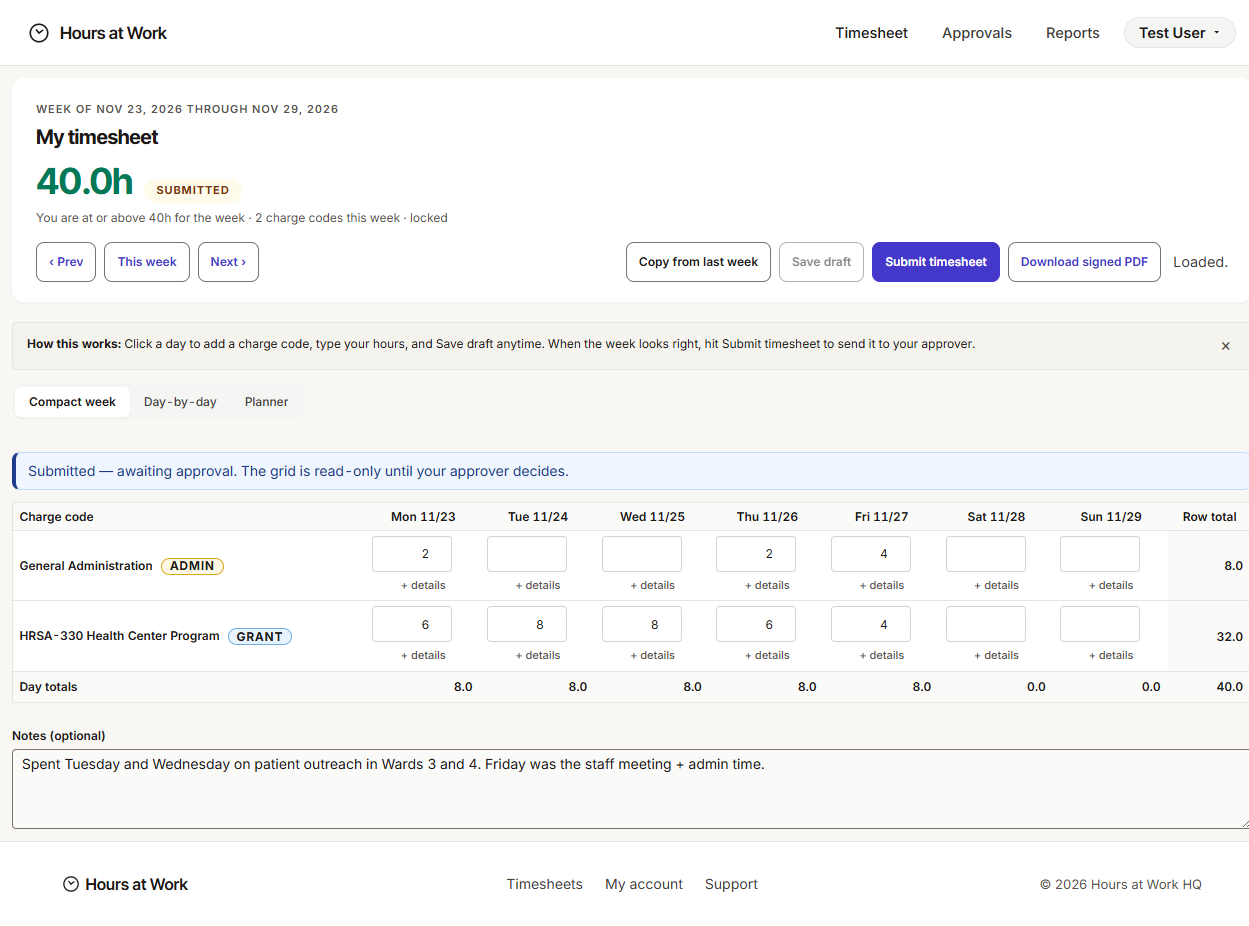
Download it for your own records. A copy is automatically retained inside your workspace, so your Fiscal Analyst can pull it later — you're not the only line of defense — but a personal copy doesn't hurt.
Next week — copy what carries over
Most weeks, the charge codes you logged against last week are the same codes you'll need this week. Click Copy from last week on a fresh week and the charge-code rows from the previous week come along.
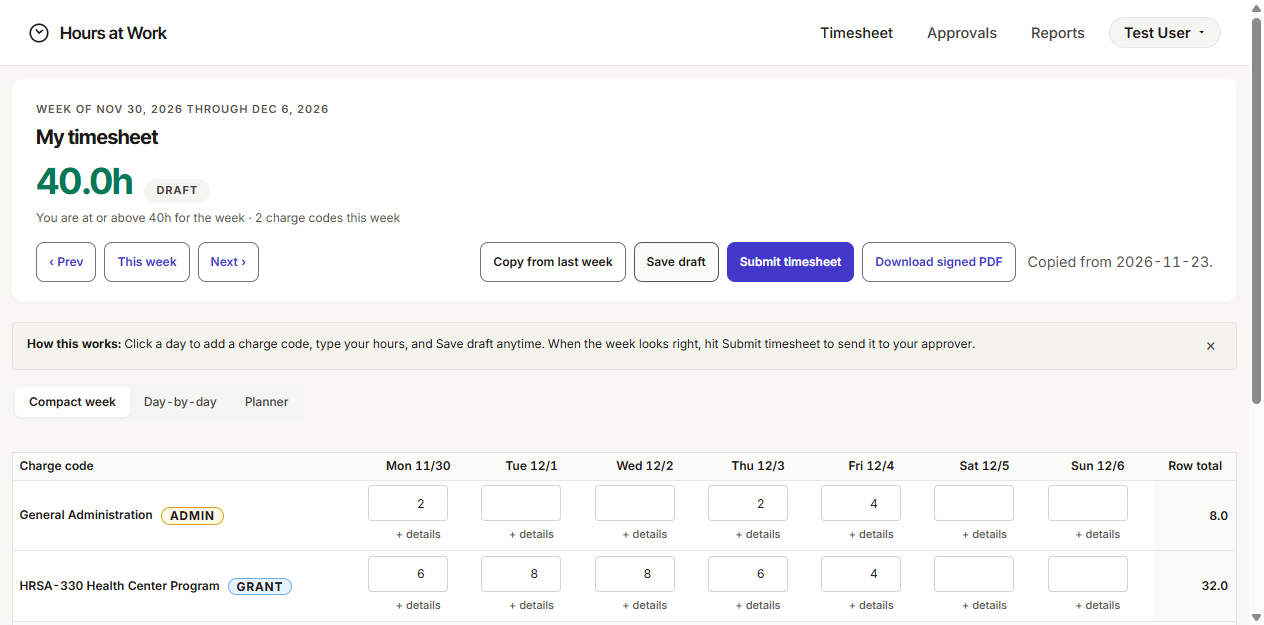
What gets copied varies by workspace. Some workspaces are configured to copy the charge-code rows and leave the hours blank. Others copy the rows and the hours. If you see hours pre-filled, double-check every cell against the work you actually did this week before you save or submit — copying is a head start, not a substitute for the real numbers.
Review and adjust the hours for the new week, then save and submit as usual.
When you take time off
Log leave under a Leave-kind charge code (Vacation, Sick, Holiday, Bereavement) on the day or days you were out. Your workspace's set of Leave codes is in the same Add-a-charge-code list, grouped under Leave. Eight hours of Vacation on Tuesday looks exactly like eight hours of any other code — same row, same column.
Leave hours count toward your week total just like worked hours. A full-time staff member who's out on Vacation Monday still wants to see 40 on the grand total — that's how the 40h Threshold report your HR Analyst runs catches under-submission and over-submission.
Reports and outputs
You don't run reports yourself. As Staff, you produce three things every week:
- A submitted timesheet — one staff-week with two signatures (yours and your approver's), the audit-ready unit of work.
- A signed PDF — your own downloadable copy of every approved week. Available from the Download signed PDF link at the top of the timesheet page after approval. Keep it; lose it; download it again — it's always available.
- A row in your workspace's reports — your Fiscal Analyst pulls effort splits, your HR Analyst pulls payroll readiness, and both of them work off the same approved timesheets you produce. The timesheet is the unit; the reports are downstream.
To walk back through prior weeks, use the ‹ Prev / Next › / This week buttons just under the page title. Every week you've ever submitted stays accessible — drafts in DRAFT, submitted in SUBMITTED, approved in APPROVED, rejected in REJECTED. Switch among Compact, Day-by-day, and Planner views at will; the data is the same.
Troubleshooting
A small set of friction points come up often. Here are the most common ones and the fix for each.
"I don't see a charge code I need"
The Add-a-charge-code list is workspace-wide and managed by your Admin. If a grant, an admin category, or a leave type you need isn't in the list, your Admin hasn't added it yet. Message them with the exact name you need (for example, "the new CDC-2200 Health Equity grant") and they can add it in a minute or two from Settings → Charge codes.
See the Admin guide for how charge codes get created — useful context if you want to send your Admin a tighter request.
"The Submit button is greyed out"
Two common causes:
- The pay period is closed. If you see a banner that says This week is in a closed pay period. Contact your admin if it needs to reopen, the Pay period containing this week has been closed by your Admin and timesheets inside it are locked. You can still see the week, just not edit or submit. Talk to your Admin about reopening.
- Your timesheet is locked through a cutoff date. If you see a banner that says This timesheet is locked. Contact your admin if it needs to reopen, an Admin has applied a Period lock with a Lock through date that covers this week. Same fix — ask your Admin.
If neither banner is showing, double-check the grand total. A week with 0.0h total submits fine — there's no minimum — but if you have rows where every cell is empty, the row hasn't really done anything and is worth removing first.
"I submitted but I made a mistake"
Once a timesheet is SUBMITTED, you can't edit it. Ask your approver to Reject it back to you. The rejection note they leave appears at the top of your week, and the timesheet flips to REJECTED — at which point Save draft re-enables, you fix the cells, and Submit timesheet sends the corrected week back.
If your approver has already Approved the week, they can't reject it from their end anymore — only your Admin can reopen an approved week. Same path, just one more person in the loop.
See the Approver guide for what happens on your approver's side after you submit — useful context for understanding why you're waiting.
"My week shows no days"
If the grid renders without any date columns, your Admin may not have seeded the Pay period covering that week yet. Pay periods are biweekly or semi-monthly windows that have to exist in the workspace before a week inside them can be logged. Message your Admin; once they seed the period, your week populates the next time you reload.
"My total doesn't match what I expect"
The Day totals row at the bottom and the Row total column on the right are your two reconciliation lanes. If your week-total is off, scan both:
- Day totals tell you per-day what you've logged. A day that reads
9.5when you actually worked eight is the row with the wrong cell. - Row totals tell you per-charge-code what you've logged across the week. A row that reads
45.0when you expected30is the code carrying hours that should sit elsewhere.
Fix the cell, watch both totals update, then Save draft.
See also
- Approver guide — what your approver sees after you submit.
- Admin guide — how charge codes, pay periods, and Approver assignments get set up.
- Glossary — every term Hours at Work uses, with definitions.