You're the workspace admin. That probably means you wear several hats already — executive director, operations director, finance lead, HR — and you've inherited Hours at Work along with everything else.
This guide walks you through the work the admin role actually does: setting up your workspace once, keeping it healthy week to week, and unsticking the small things that come up. Every step explains why it matters, not just where to click, so you can answer questions when staff ask.
A quick orientation on the words this guide uses. Full definitions live in the Glossary.
- Workspace — your organization's space in Hours at Work. One nonprofit, one URL, one set of charge codes, one set of people.
- Charge code — anything staff log hours to. Three kinds: Admin, Grant, Leave.
- Pay period — a biweekly or semi-monthly window. Either OPEN or CLOSED.
- Timesheet — one staff member's hours for one work week. States are DRAFT, SUBMITTED, APPROVED, or REJECTED.
- Role — every person is one of Staff, Approver, or Admin.
- Access — an optional add-on on top of a role: Fiscal Analyst or HR Analyst.
Stick with these terms as you go. They're the same ones your staff, approvers, and funders will see in the product and in this documentation.
Getting started
You'll do most of these once, in roughly this order. Plan for an afternoon for first-time setup if you're coming from a spreadsheet.
1. Sign in to your workspace
Open the welcome email from Hours at Work and follow the link to your-org.hoursatwork.com. Enter your email and the password you set during signup, then click Log in.
Why this matters. Every workspace lives on its own URL. If you land on the generic hoursatwork.com sign-in by accident, the system won't know which workspace you mean and will reject your password.
What you'll see. Your timesheet for the current work week. Even as an admin, you have a timesheet — admins are real people with hours to log, just like everyone else.
2. Open Settings
Click your name in the top-right of any page, then pick Settings from the dropdown.
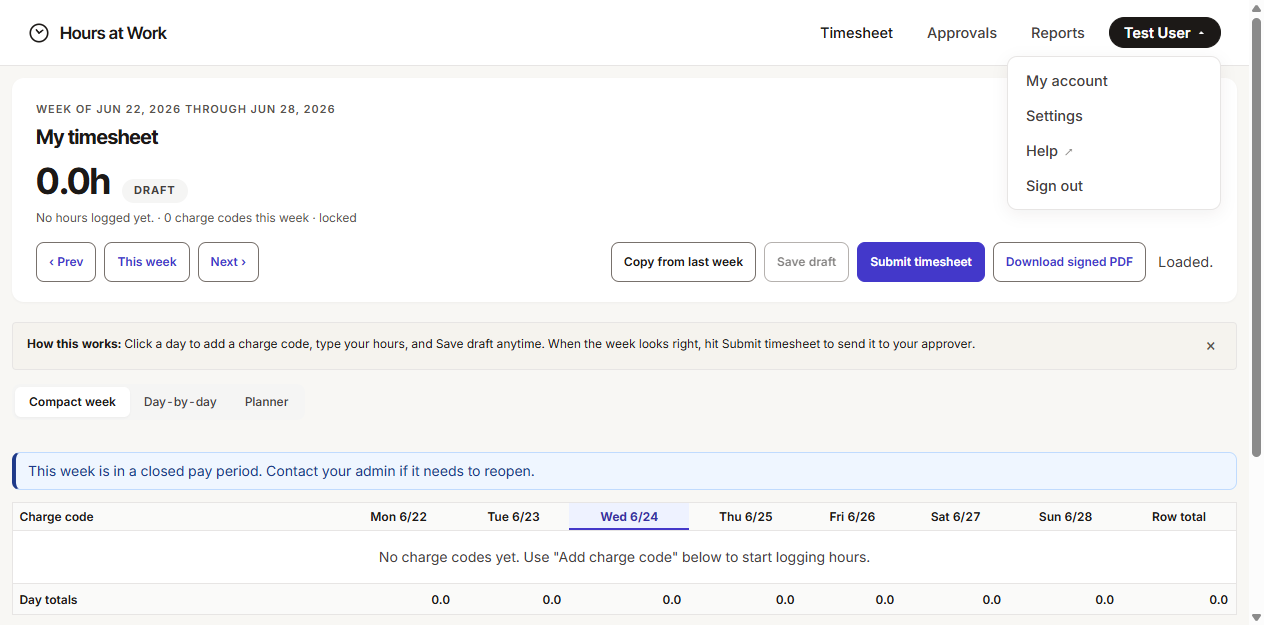
You'll land on the Settings overview. Everything an admin can configure is grouped into three categories:
- TIME & MONEY — Workspace, Charge codes, Pay periods, Pay categories.
- PEOPLE — People, User profiles, Approver assignments, Departments.
- OPERATIONS — Period locking, Billing.
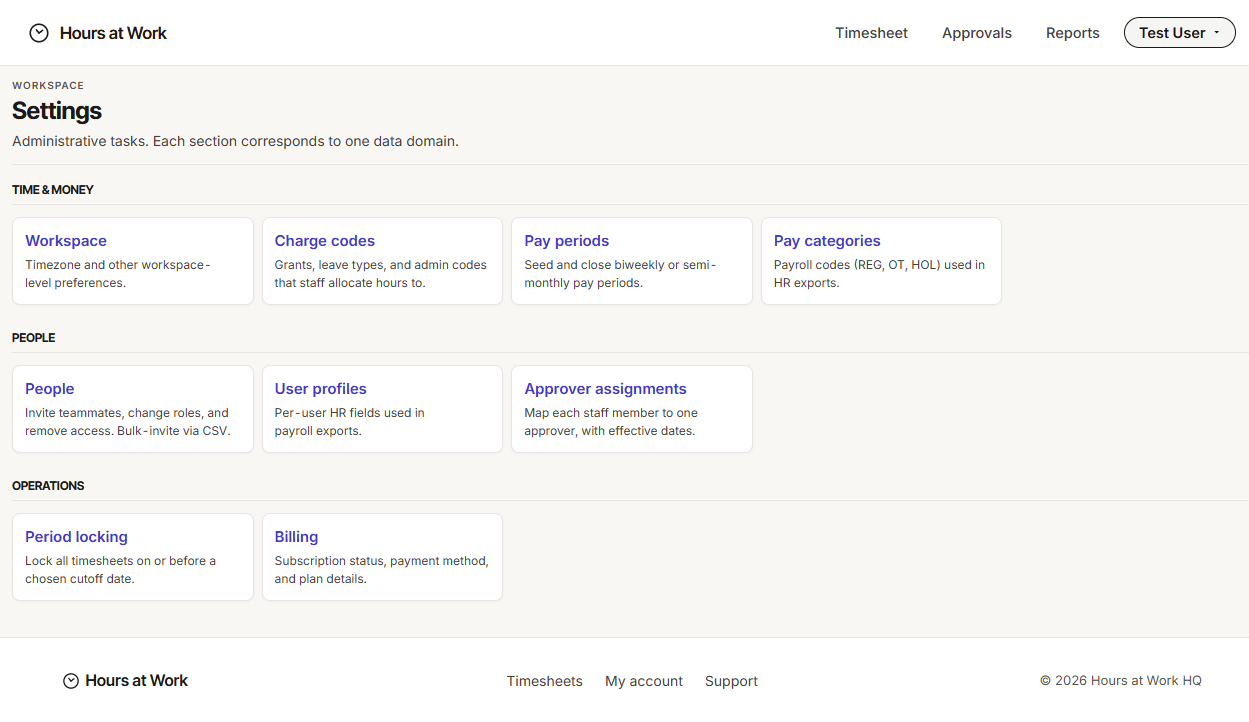
Why this matters. The Settings link is your home base for every admin task in this guide. If you ever feel lost, come back here.
3. Set your workspace basics
Open Settings → Workspace. Three things to set:
- Timezone. Pick the timezone your organization runs on (for example, America/New_York). Every timesheet entry is stamped in this timezone from here forward.
- Submission deadline. The number of business days after a pay period ends by which staff must submit. Saturdays and Sundays are skipped automatically. This only applies to future pay periods — historical periods keep whatever deadline they already had.
- First day of work week. Pick Sunday (Sun–Sat) or Monday (Mon–Sun).
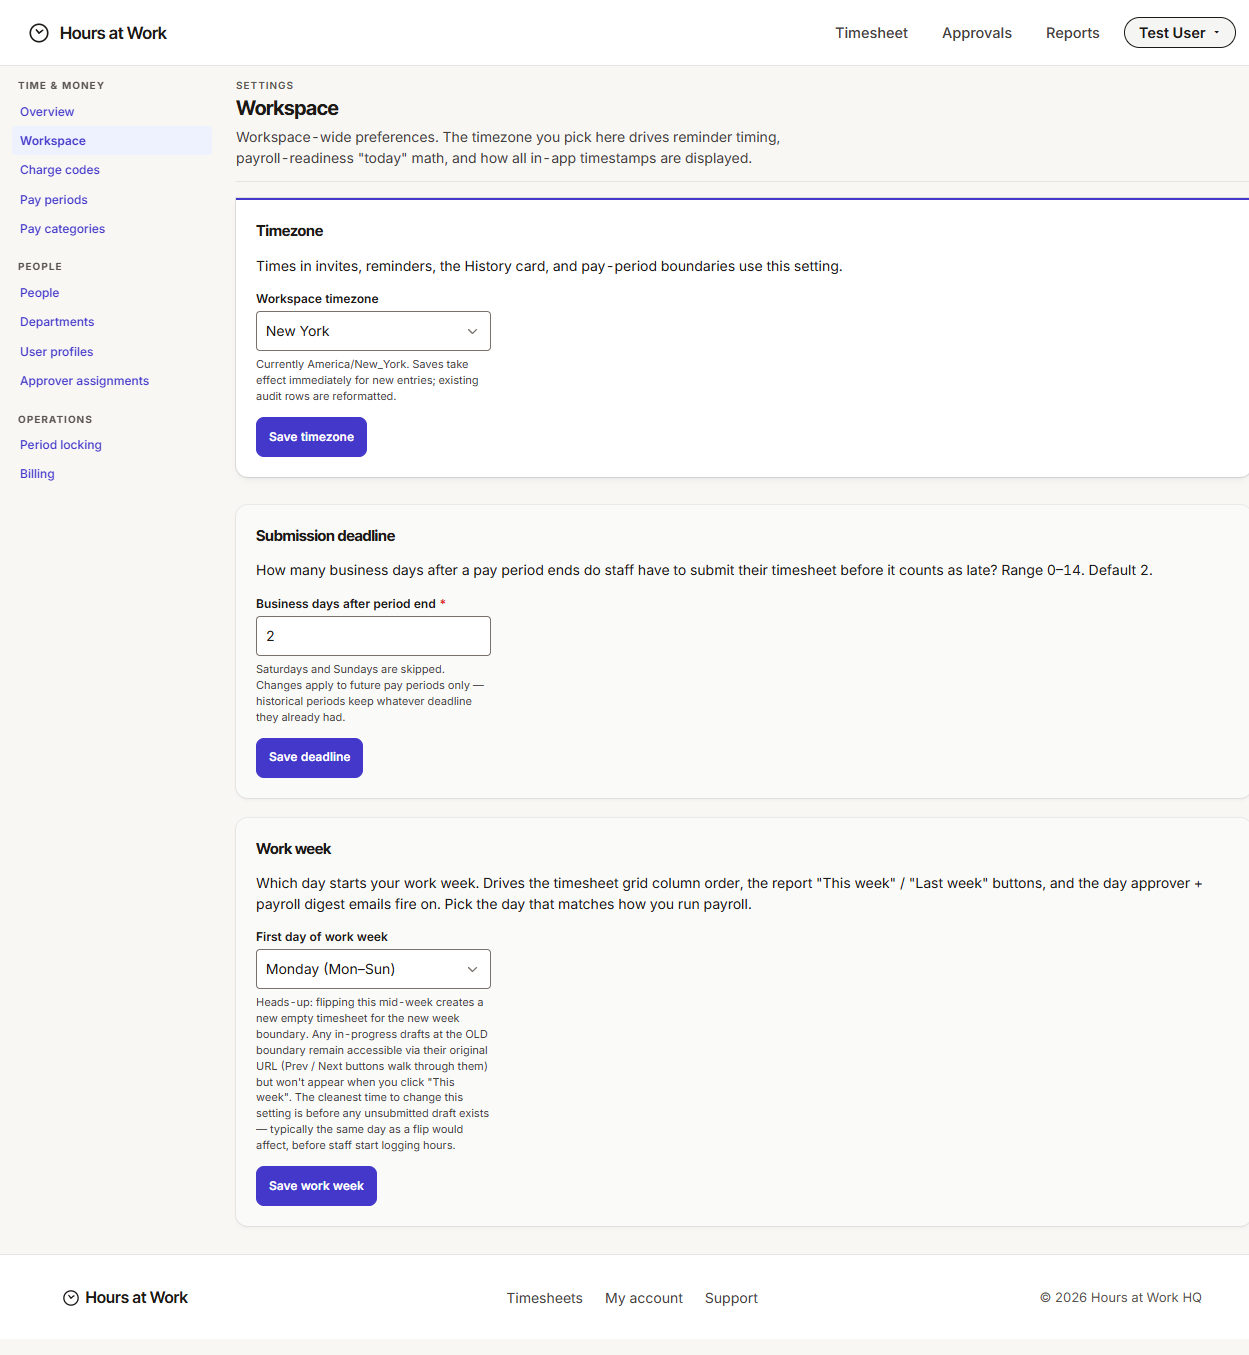
Why this matters. These three settings shape every timesheet, every report, and every funder PDF your workspace will ever produce. Get them right at the start and you won't have to fix them later.
About changing work week mid-stream. Flipping the first day of the work week creates a fresh empty timesheet at the new boundary. Any in-progress drafts at the old boundary stay accessible by their original URL — the ‹ Prev and Next › buttons walk through them — but they won't appear when staff click This week. If you can, change this setting before staff start logging hours for the affected week.
What you'll see. Each field saves immediately when you change it. There's no separate Save button for workspace settings.
4. Set up departments (optional)
Open Settings → Departments. If your nonprofit groups staff into divisions — Programs, Clinical, Operations, Development — add each one here.
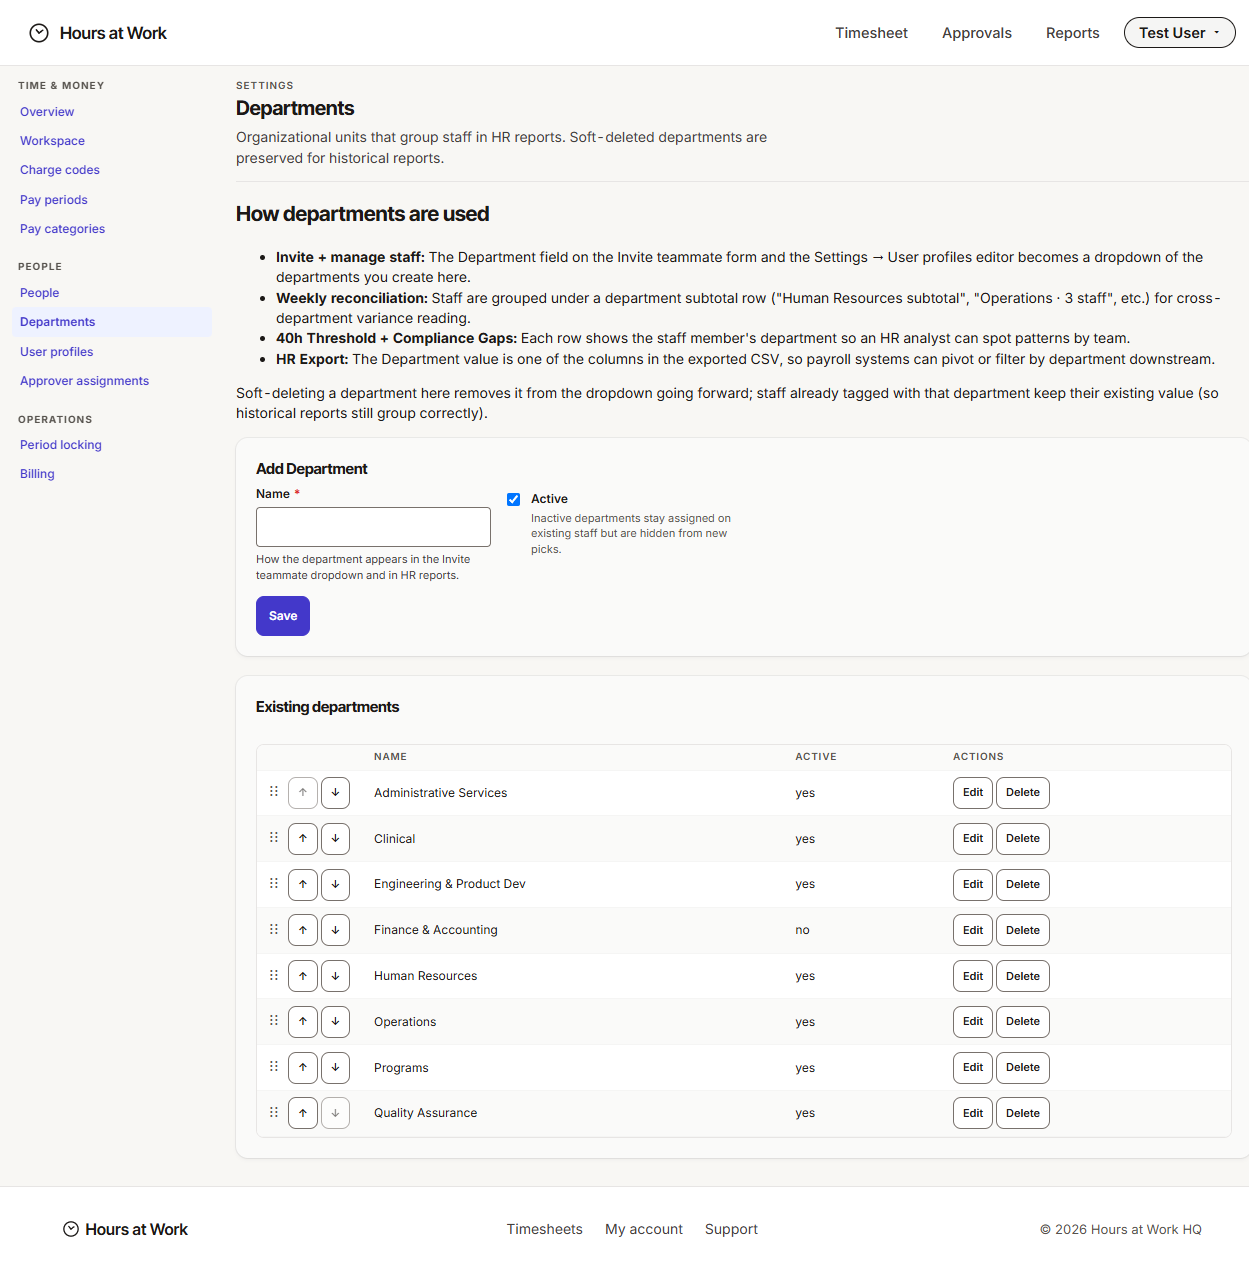
Why this matters. Departments are an optional grouping you can attach to each staff member's User profile. Reports — Weekly Reconciliation, Funding Reconciliation, 40h Threshold — let your analysts filter by Department. Skip this step if everyone's in one bucket; come back when your team grows.
What you'll see. A list of department names. You can edit or remove a department later without breaking history.
5. Seed your first pay periods
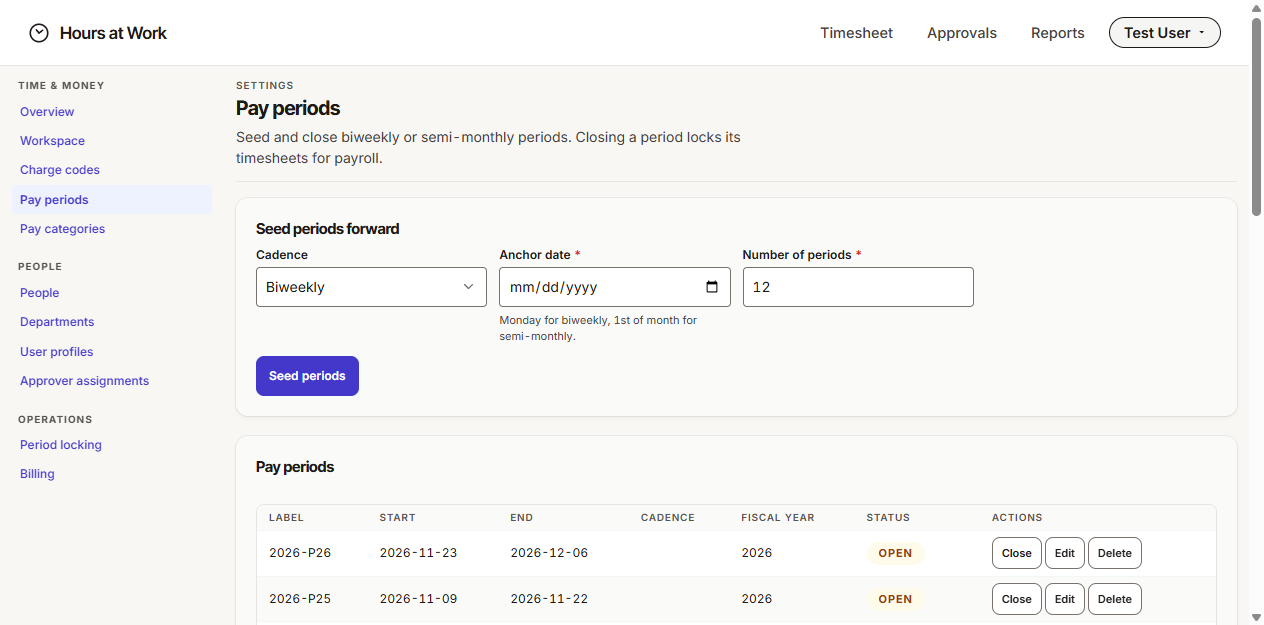
Open Settings → Pay periods. In the Seed periods forward section at the top:
- Cadence. Pick Biweekly or Semi-monthly. Biweekly is every other Monday. Semi-monthly is the 1st and 16th of each month.
- Anchor date. For biweekly, pick any Monday that anchors your schedule. For semi-monthly, pick the 1st of any month.
- Number of periods. Twelve is the default — about six months of biweekly periods or six months of semi-monthly.
Click Seed periods.
Why this matters. Staff can only log hours and submit timesheets against a pay period that exists. If you don't seed periods, the staff grid tells them "no period exists for this week" — a great way to lose a Friday afternoon to confused emails.
What you'll see. A table of newly-created pay periods, each showing start date, end date, submission deadline, and status (OPEN by default). You can edit or delete individual periods from this table if anything looks wrong.
6. Confirm your pay categories
Open Settings → Pay categories. You'll find a starter list: REG (regular), OT (overtime), HOL (holiday), VAC (vacation), SCK (sick), and a couple of optional codes like DIFF (shift differential) and CALL (on-call).
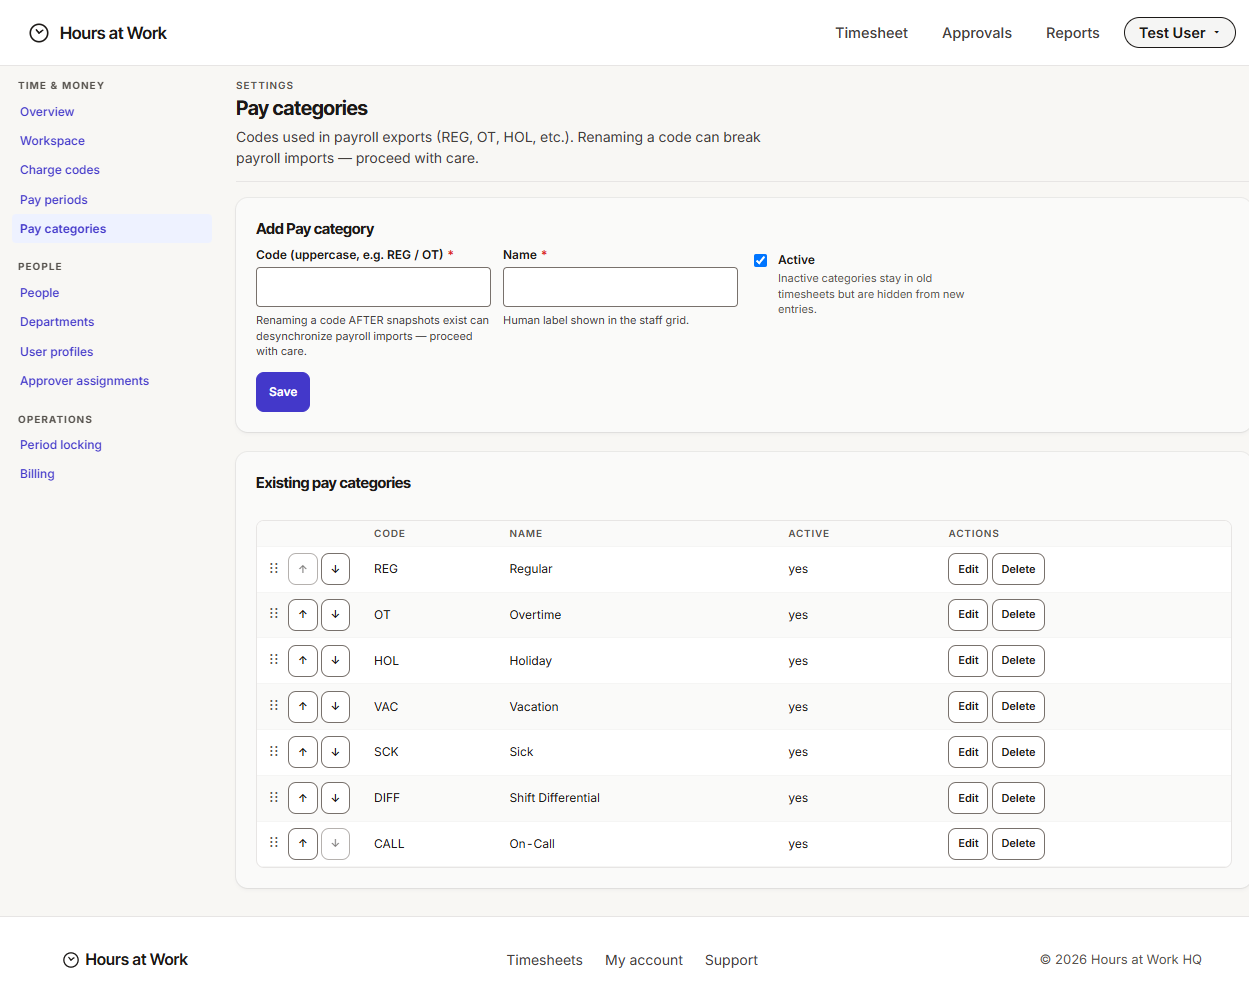
Why this matters. Pay categories are payroll codes. They classify hours for your HR Analyst's payroll-ready export. They're different from charge codes (which describe what the work was for). Most workspaces never need to touch this list. If your payroll provider uses unusual codes, you can add or rename them here.
What you'll see. A list of codes, each with a label and an Active checkbox.
7. Build your charge code list
Open Settings → Charge codes. This is where you tell Hours at Work what your staff actually work on.
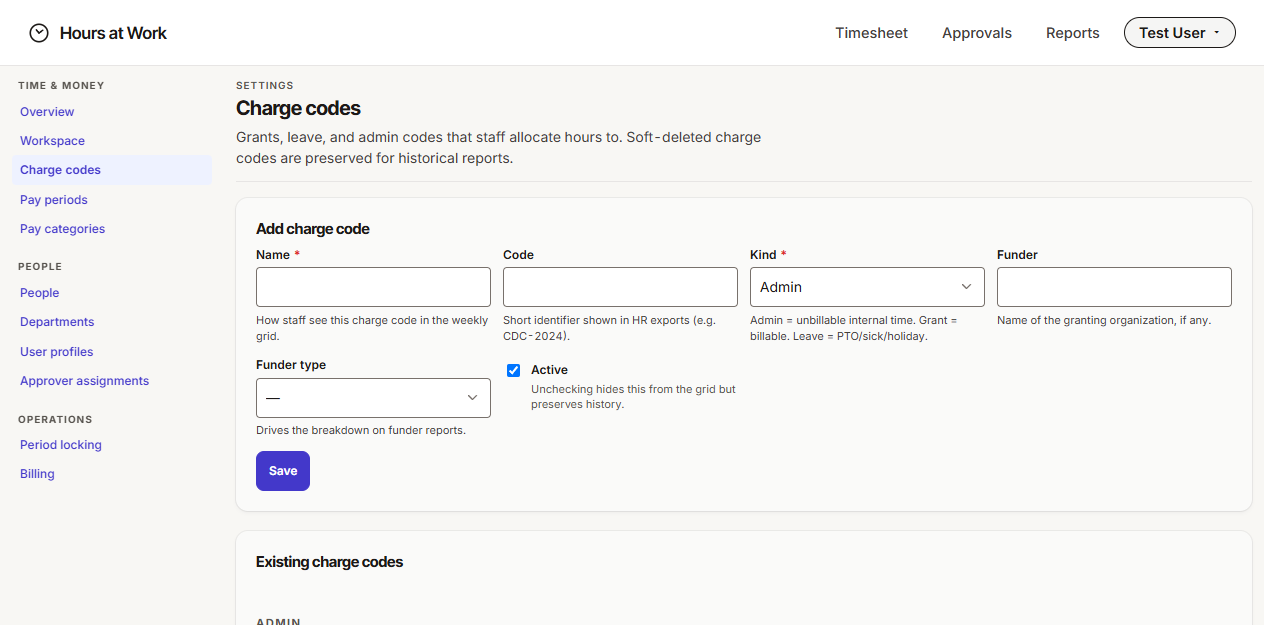
In the Add charge code form at the top:
- Name. What staff see in their weekly grid. Write it the way you'd say it out loud ("HRSA Maternal Health 2025", "PTO").
- Code. A short identifier for HR exports (
HRSA-MAT-25,PTO). Keep these consistent — your fiscal analyst will thank you. - Kind. Pick one: - Admin for unbillable internal time (staff meetings, admin work). - Grant for funder-billable work. This unlocks the Funder fields. - Leave for PTO, sick, holiday, bereavement.
- Funder (Grant only) — the granting organization (HRSA, CDC, Kellogg Foundation).
- Funder type (Grant only) — Federal, State, Foundation, Local, Internal, or Other. Drives the breakdown on funder reports.
- Leave subtype (Leave only) — PTO/Vacation, Sick, Holiday, Bereavement, or Other. Used by the Weekly Reconciliation report.
- Active. Leave it checked. Unchecking hides the code from the staff grid but preserves history.
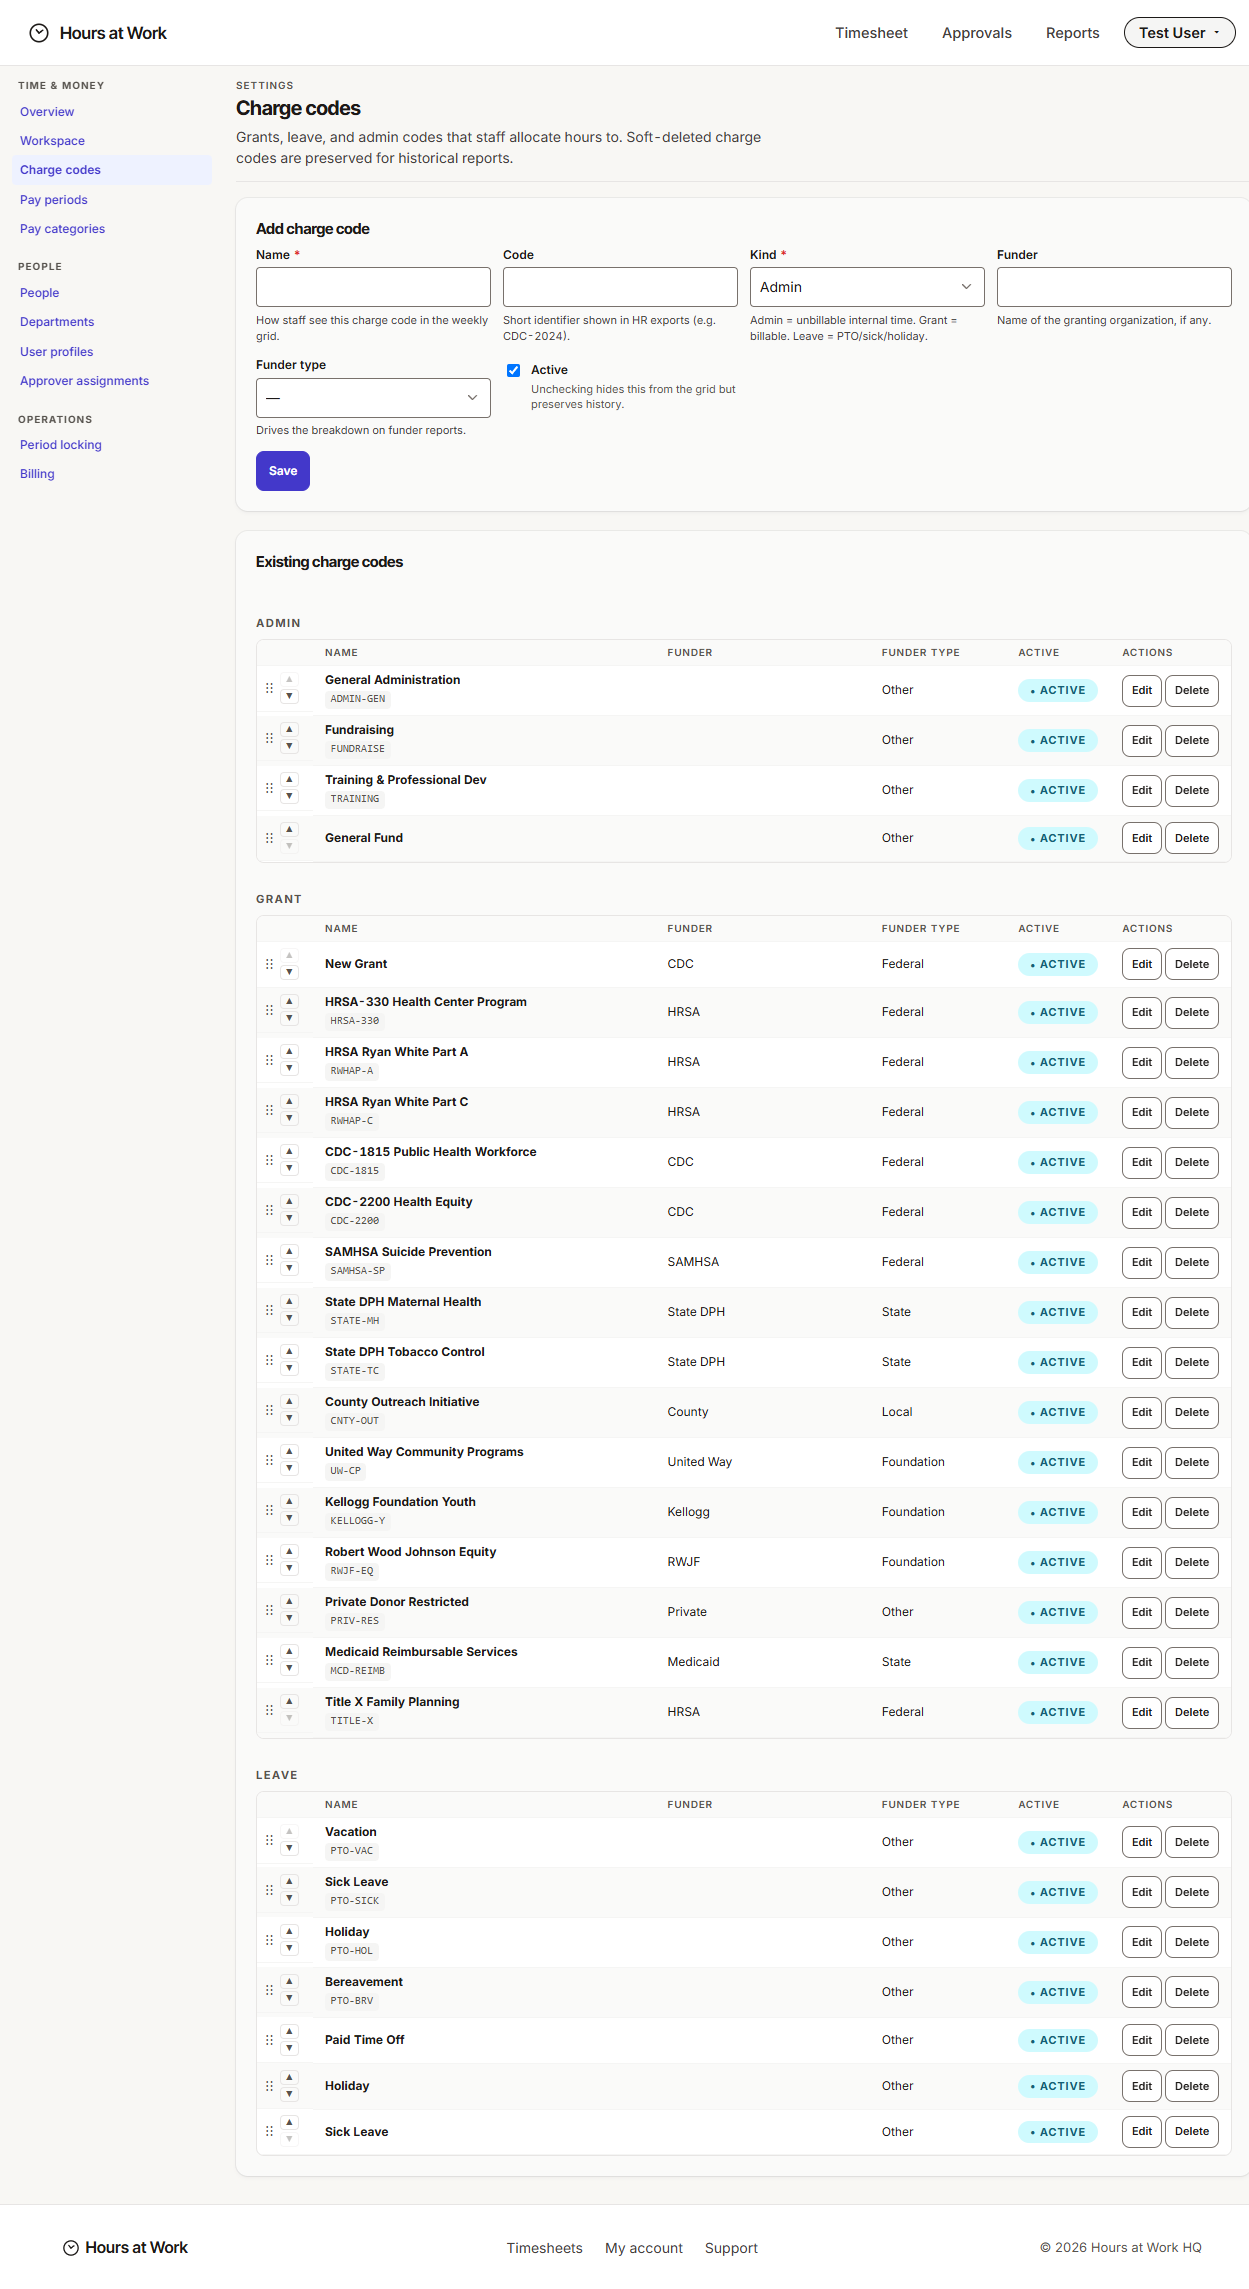
Existing charge codes are listed below the form, grouped by kind: Admin, Grant, Leave.
Why this matters. The charge code list is the spine of everything else. Staff allocate hours to charge codes. Approvers approve hours against charge codes. Fiscal Analysts pull funder reports by Funder + Funder type. Get the Funder and Funder type fields right when you create a Grant code — they're what makes audit-ready funder reports work later.
What you'll see. A confirmation toast, and the new code appears in the appropriate grouped list below.
8. Invite your team
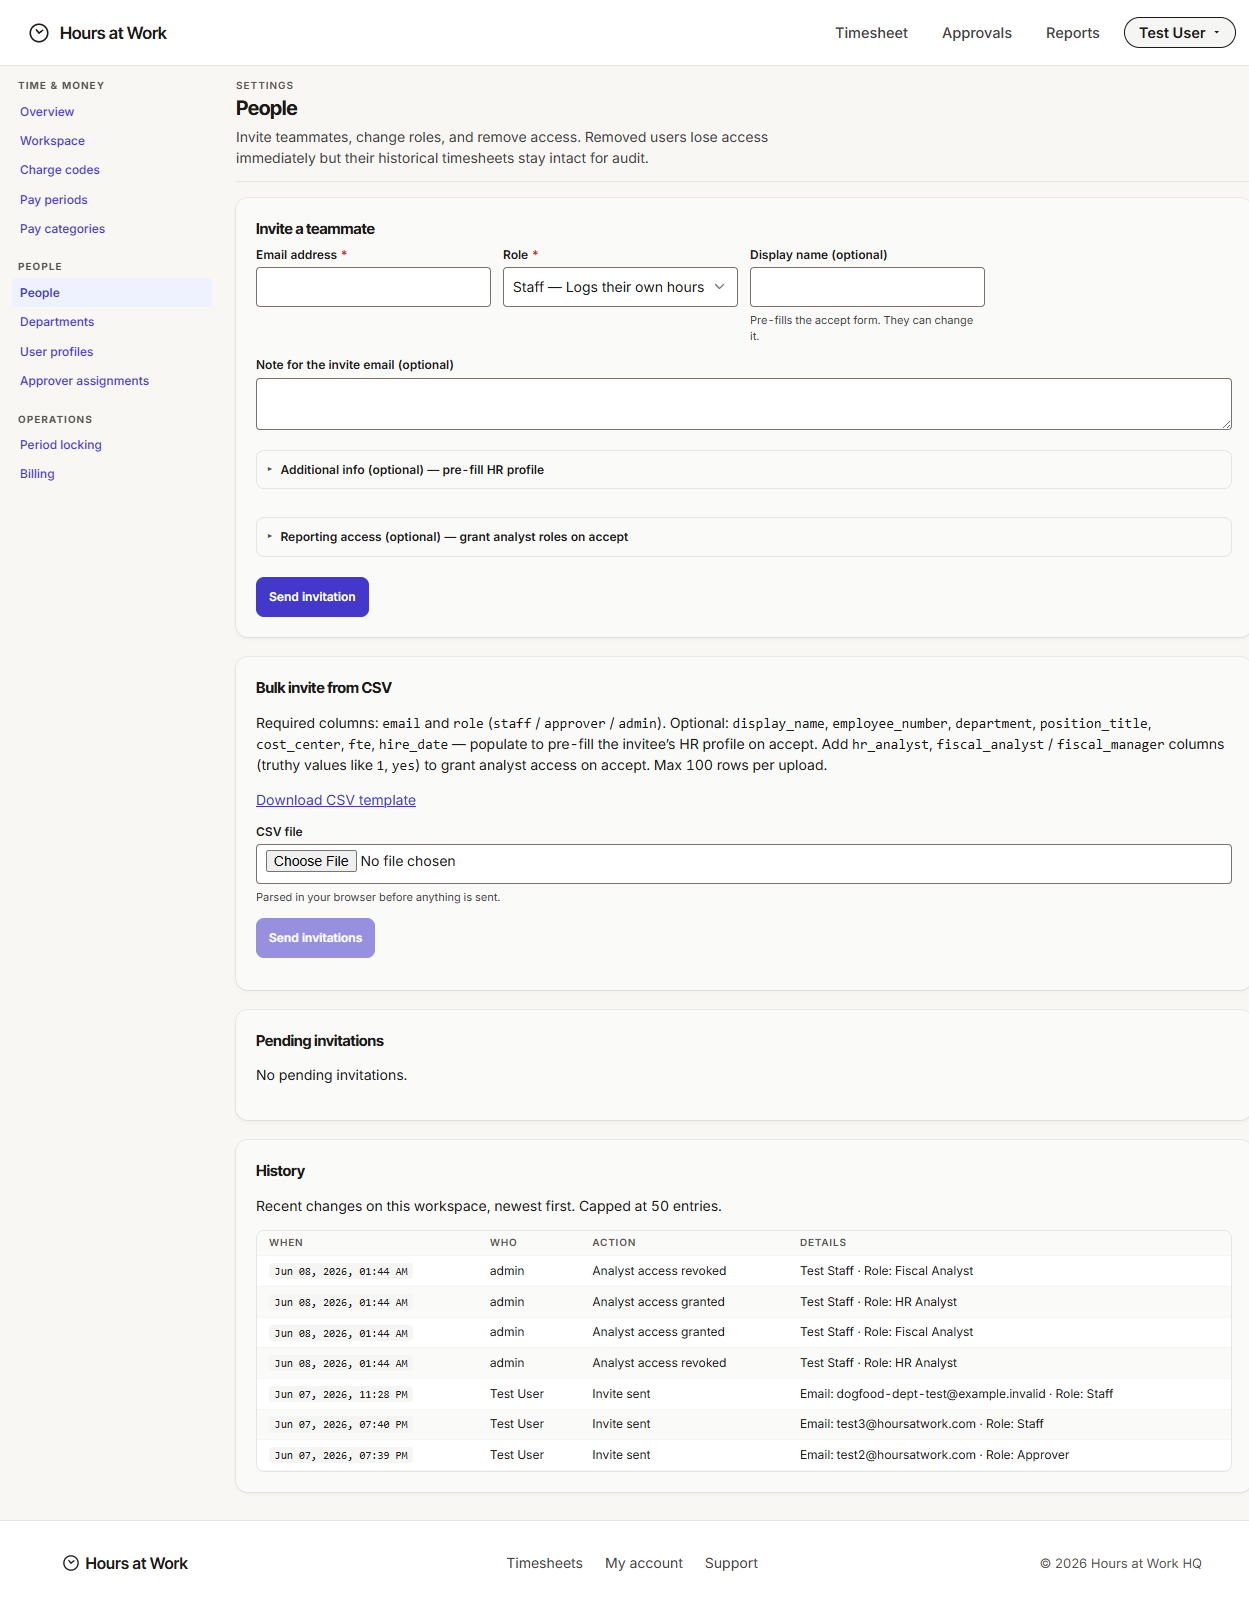
Open Settings → People. Two ways to invite:
One at a time. In the Invite a teammate form:
- Email. Their work email.
- Role. Pick one: - Staff — Logs their own hours. Cannot approve or manage others. - Approver — Signs off on assigned staff timesheets. Can also log their own hours. - Admin — Full workspace access. Manages charge codes, periods, exports, billing, and people.
- Display name (optional) — pre-fills the accept form. They can change it when they accept.
- Note for the invite email (optional) — anything you want them to read before clicking through.
Bulk invite. Scroll to the Bulk invite from CSV section, click Download template, fill in the spreadsheet, and upload it. The template uses the same role labels: Staff, Approver, Admin.
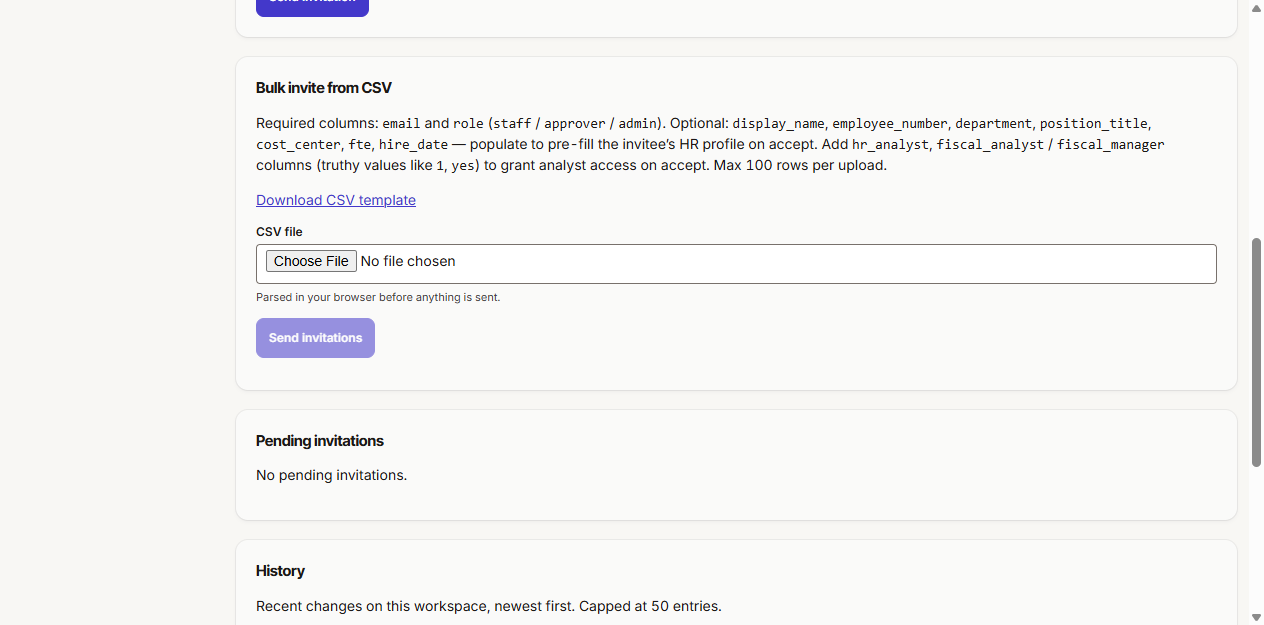
Why this matters. Every person who logs hours, signs off on hours, or pulls reports needs an invite — there's no shared-login workaround. Bulk invite is the way to go for more than five people.
What you'll see. Pending invitations appear in a table below. Each row shows the email, role, who invited them, and when. The invitee gets an email with a link to accept and set a password.
9. Map staff to approvers
Open Settings → Approver assignments.
In the Assign approver form, pick a staff member, pick an approver, and set an effective-from date (defaults to today). Save.
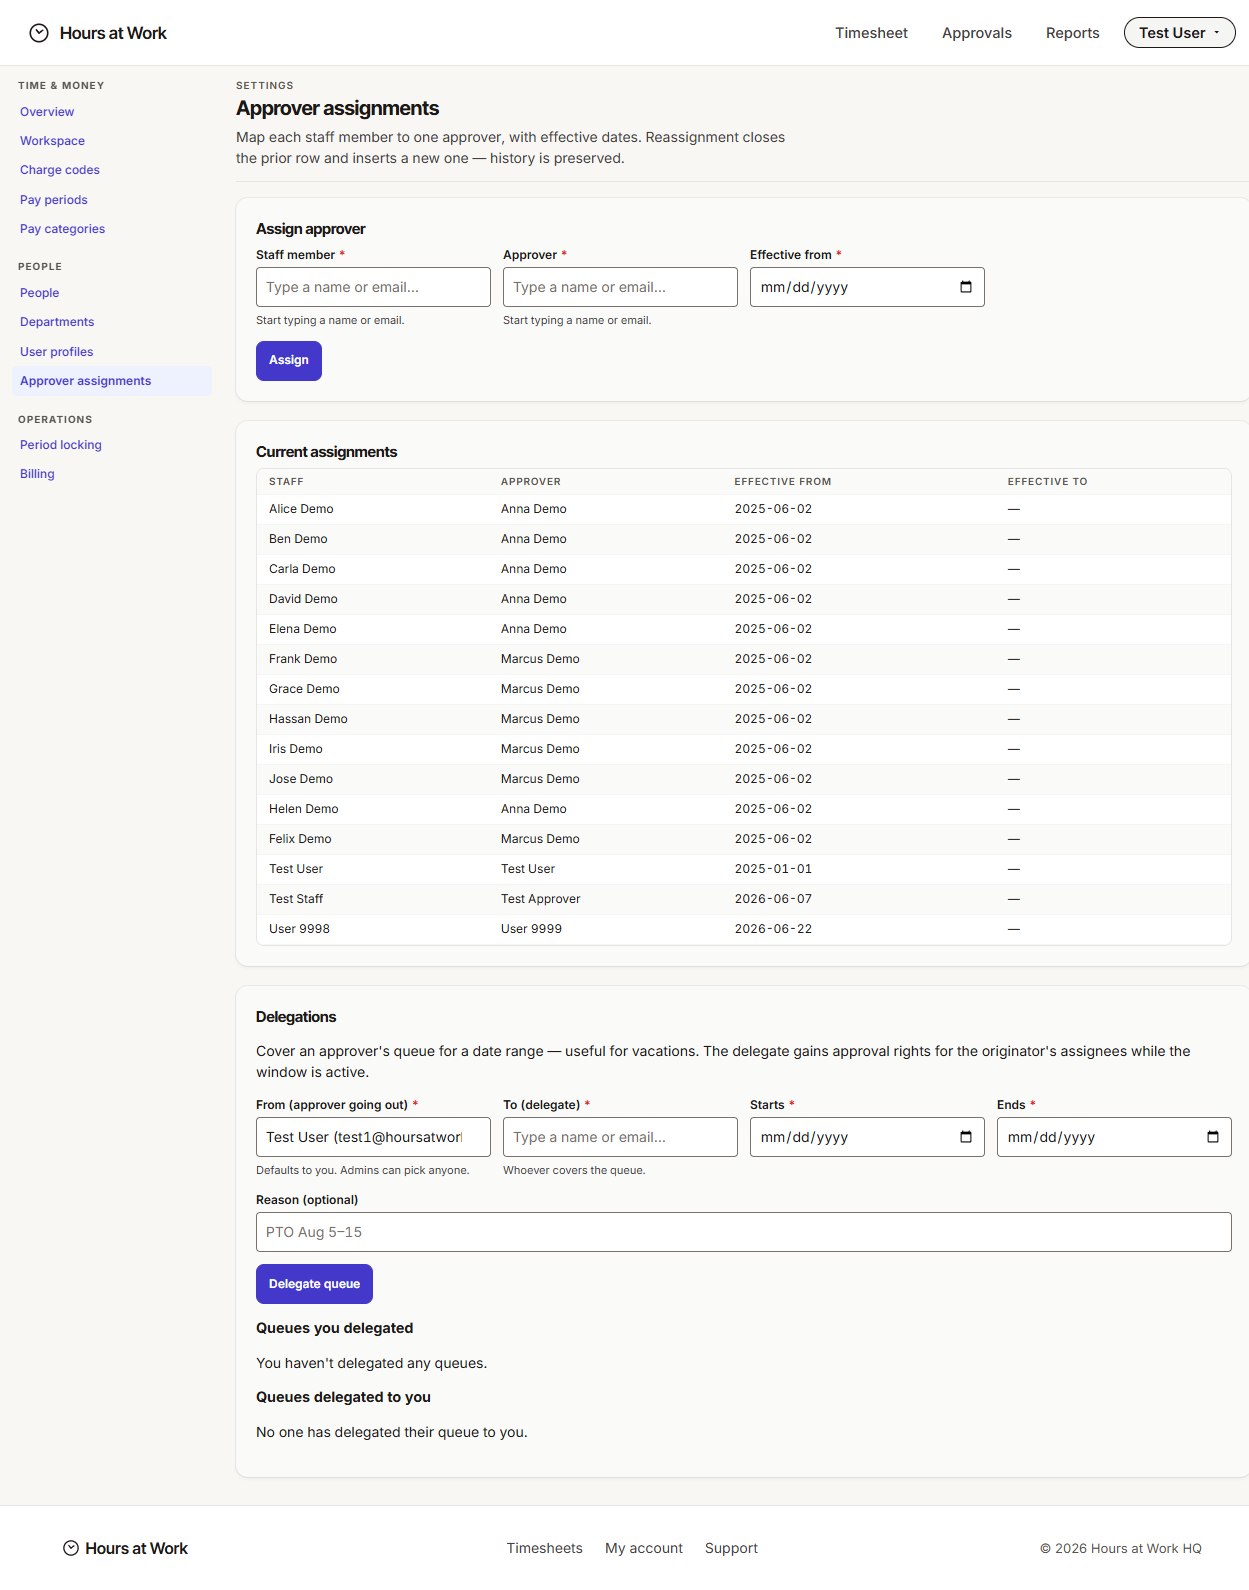
Why this matters. A staff member without an Approver assignment can't submit a timesheet — the system has nowhere to send it. This is the single most common cause of "I can't submit" tickets. Set up an assignment for every staff member during onboarding and you'll skip the headache.
What you'll see. The new assignment appears in Current assignments below the form. Each staff member has exactly one active Approver at a time. Setting a new Approver for someone end-dates the previous one automatically.
10. Grant analyst access (if applicable)
If you have a fiscal analyst or HR analyst on staff, they need an Access add-on on top of their base role.
Open Settings → User profiles. Find the person, click Edit. In the Role & access section:
- HR Analyst — Unlocks Payroll Readiness and the HR Export plus the rest of the payroll-side reports.
- Fiscal Analyst — Unlocks the fund-side reports (Funding Reconciliation, Charge-code Effort, Staff Effort).
- Fiscal Manager (UI label variant) — In some builds, the checkbox reads "Fiscal Manager" and is described as "Fiscal Analyst access plus charge-code editing." It's a stronger Fiscal Analyst grant that also lets the person edit your charge-code list. If you see this in your workspace, treat it as Fiscal Analyst plus edit rights — the canonical term is still Fiscal Analyst.
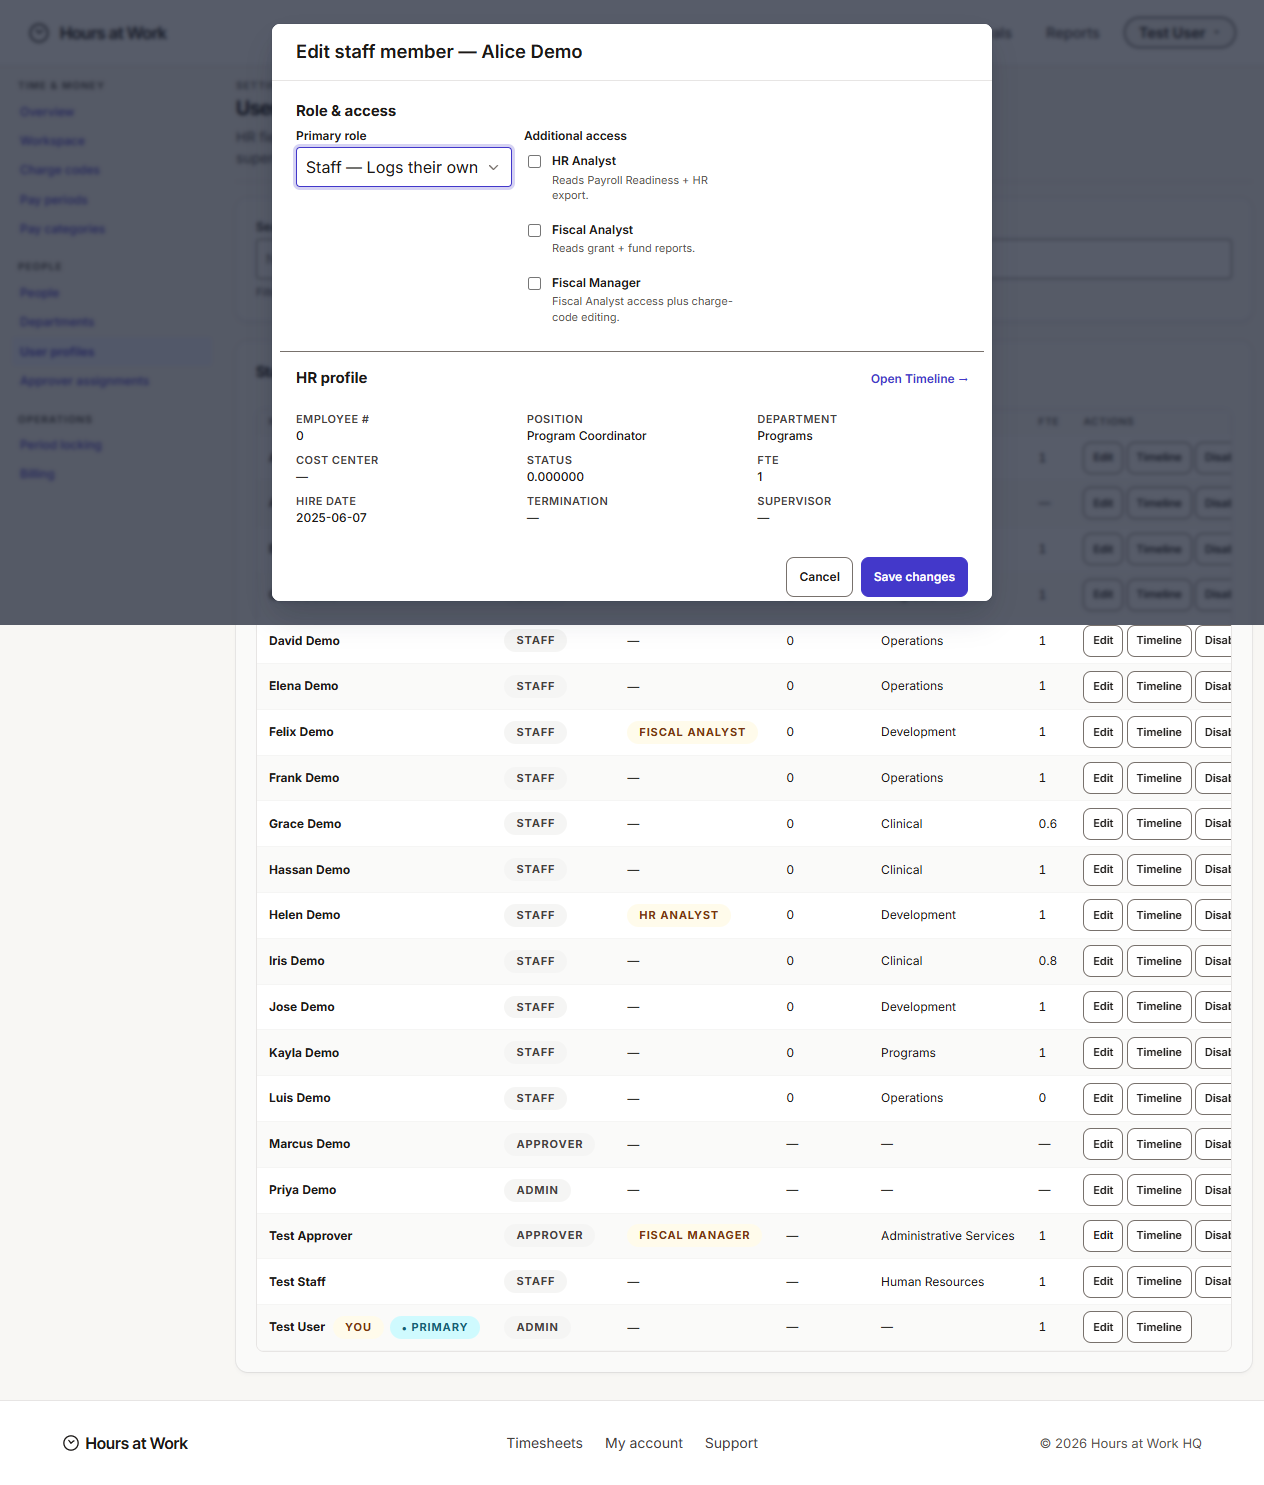
Why this matters. Access add-ons layer on top of the base role. They unlock reports and exports without changing what the person can do day to day. An Approver with Fiscal Analyst Access can still approve timesheets and pull funder reports.
What you'll see. Save closes the modal and the ACCESS column on the User profiles table updates.
Daily workflow
Once your workspace is set up, day-to-day admin work is small but persistent. Here's what you'll do most days.
Check on stuck items
If you're also an approver, glance at the Approvals queue (top nav) once a day during the submission window. Even if you're not, scanning Settings → People → Pending invitations weekly catches invites that never got accepted.
Why this matters. A pile-up at submission time is much harder to clear than two reminder emails on Tuesday.
Process new-hire invites
Open Settings → People and use Invite a teammate (or Bulk invite from CSV if several at once). Set the role correctly the first time — it's easier than fixing it later.
Why this matters. New hires can't log hours until they accept their invite and set a password. The longer you wait, the more retroactive entry your new hire has to do.
Add a new charge code when a grant lands
Open Settings → Charge codes → Add charge code. Set Kind to Grant, fill in Funder and Funder type, and save.
Why this matters. New charge codes appear in the staff grid immediately. Staff can backfill the current open week to log any hours already worked on the new grant.
Update an approver assignment
When someone transfers, gets promoted, or moves to a new Approver, open Settings → Approver assignments. End-date the old assignment, then add the new one with the right effective-from date.
Why this matters. The effective-from date controls which weeks of timesheets route to the new Approver. Set it to the start of the new arrangement, not today, so historical weeks still route correctly.
Cover an approver going on leave
Open Settings → Approver assignments → Delegations. Pick the Approver going out, pick the delegate, set the date range and an optional reason.
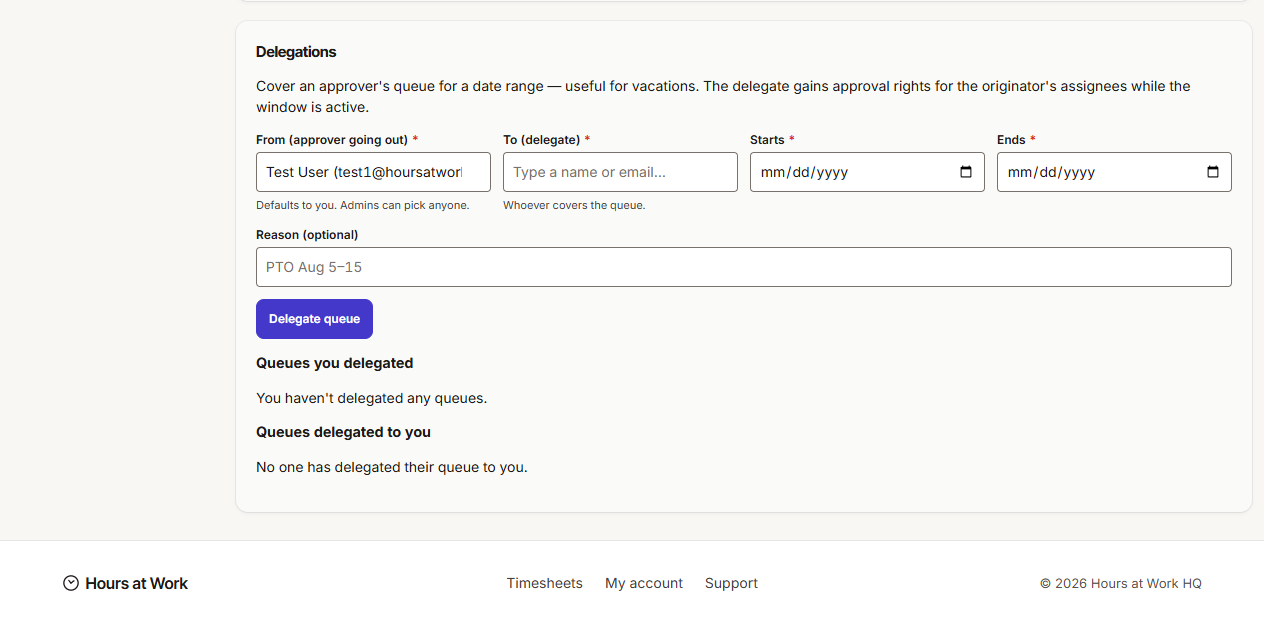
Why this matters. Delegations reroute the original Approver's pending queue without changing the underlying assignments. When the date range ends, everything snaps back automatically — no cleanup needed.
Periodic tasks
Some admin work is monthly, quarterly, or annual. Calendar these so they don't sneak up on you.
End of each pay period — close the period
Once everything in a pay period has been approved, open Settings → Pay periods and click Close on that period's row.
Why this matters. Closing a period prevents new edits to timesheets inside it. Combined with Period locking (next section), this is your audit boundary — the line between "in progress" and "this is what we sent to the funder."
What you'll see. The period's status flips from OPEN to CLOSED, and a Reopen button appears in place of Close. You can still reopen a closed period if you need to.
After payroll runs — apply a period lock
Open Settings → Period locking. In Lock through date, pick the date of the most recent pay period end and apply.
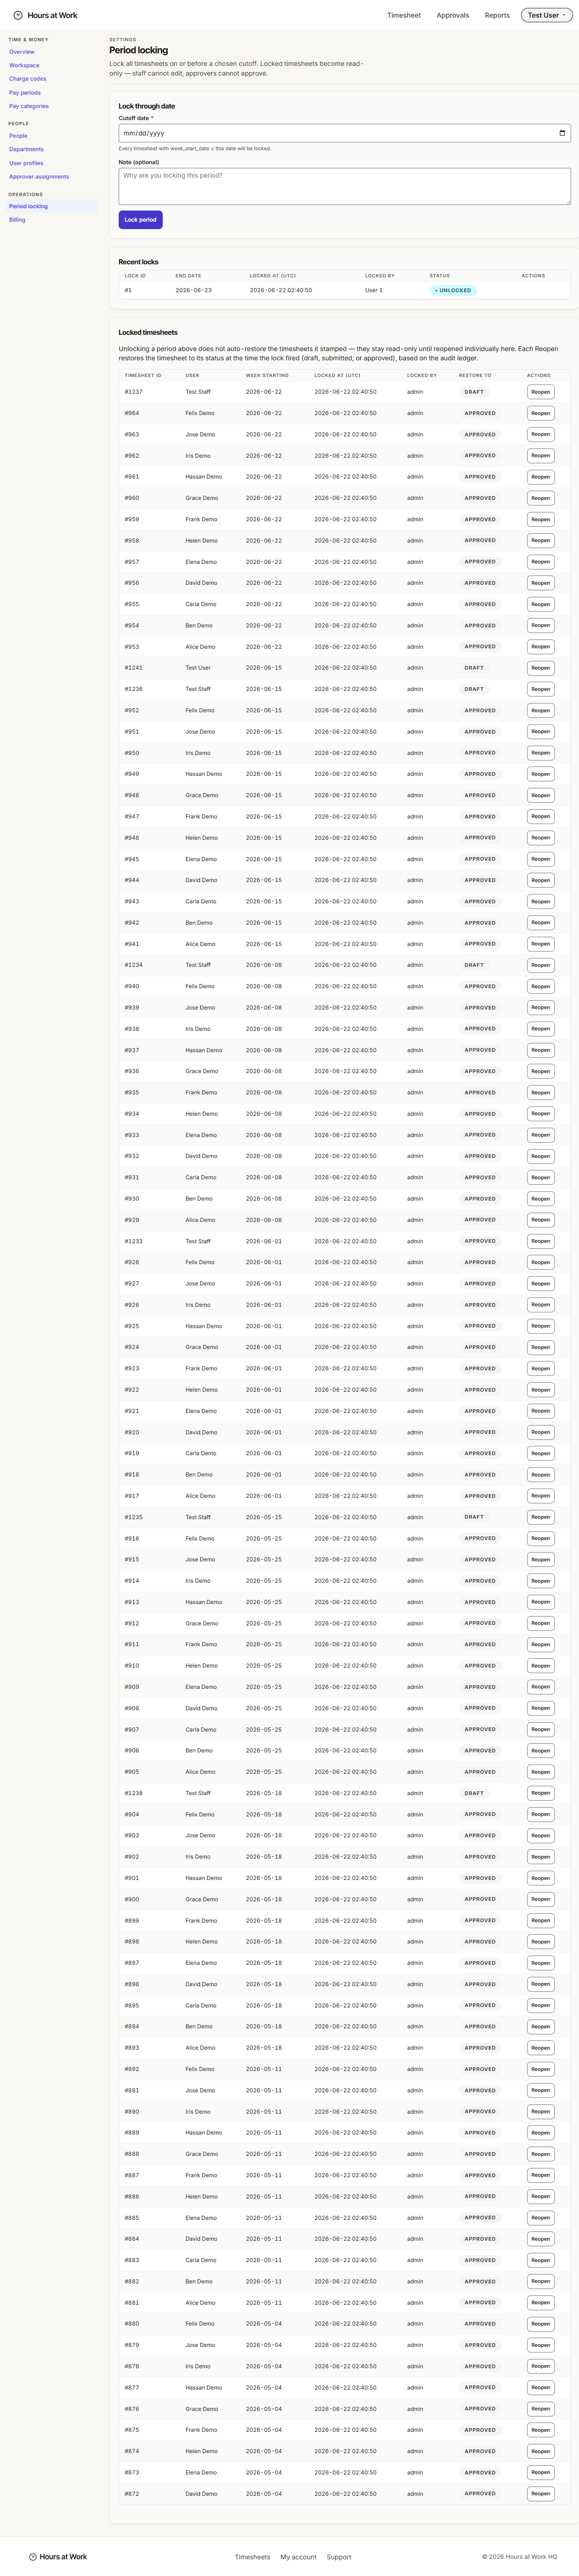
Why this matters. Period locking is your audit-readiness gate. Every timesheet ending on or before the Lock through date becomes uneditable — by staff, approvers, and you. Funders auditing your records see a clean, frozen history.
What you'll see. The Locked timesheets table fills with every timesheet that fell on or before your lock date. Recent locks shows a running log of every lock you've applied — exactly what an auditor wants to see.
Quarterly — seed the next batch of pay periods
Open Settings → Pay periods. Look at the last period in the table. If it's within the next two months, seed forward again. Same form as the initial setup: cadence, anchor date, number of periods.
Why this matters. Staff can't log hours against a period that doesn't exist. Running out of seeded periods is invisible until the morning your first staff member tries to log Monday's hours and can't.
Quarterly — review the charge code list
Open Settings → Charge codes. For any grant that has wrapped, find the code, click Edit, and uncheck Active.
Why this matters. Deactivating a closed grant hides it from the staff grid going forward. History is preserved — your fiscal analyst can still pull reports for the period when the grant was open.
Annually — review workspace settings and pay categories
Open Settings → Workspace and confirm timezone, submission deadline, and first day of work week. Then open Settings → Pay categories and confirm the codes still match what your payroll provider expects.
Why this matters. Things drift. Payroll providers change formats. New states join the org. An annual look-see catches issues before they hit production.
Reports and outputs
Admins don't pull aggregate reports themselves — that's what the Fiscal Analyst and HR Analyst Access add-ons are for. But you do have a few admin-facing outputs that matter for audits and onboarding.
People history
Open Settings → People, scroll to History.
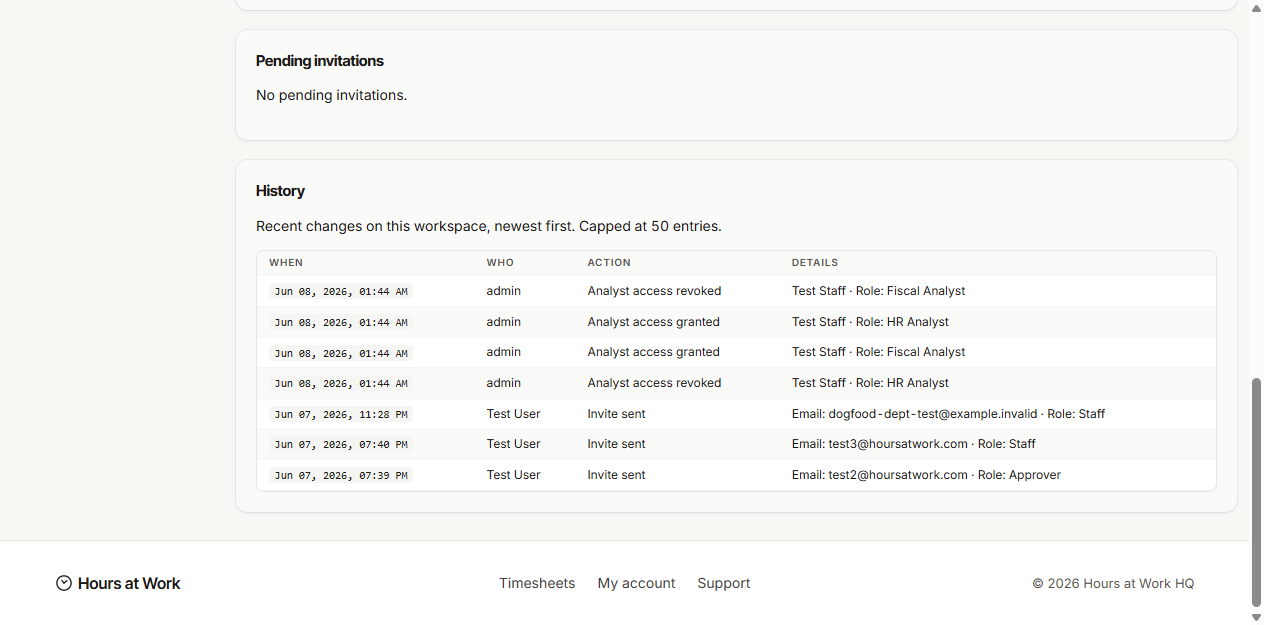
A running log of invites sent, roles changed, and Access add-ons granted or revoked. The first thing to pull during an audit when someone asks "who had what access, when?"
Pending invitations
Open Settings → People and look at the Pending invitations table. Anyone who hasn't accepted yet shows up here, with how long the invite has been outstanding.
Why this matters. Stale invites cause "I never got invited" emails. A weekly glance keeps your team in sync.
Recent locks
Open Settings → Period locking → Recent locks.
A log of every lock you've applied, including who you were when you applied it and how many timesheets the lock captured. Auditors love this.
Per-person audit timeline
Open Settings → User profiles, find the person, click Timeline.
A change history for one person — role changes, access grants, profile edits. The first thing to open when an auditor asks "how did Jane go from Staff to Approver in 2024?"
Billing
Open Settings → Billing to see your workspace's subscription status, plan, and invoice history.
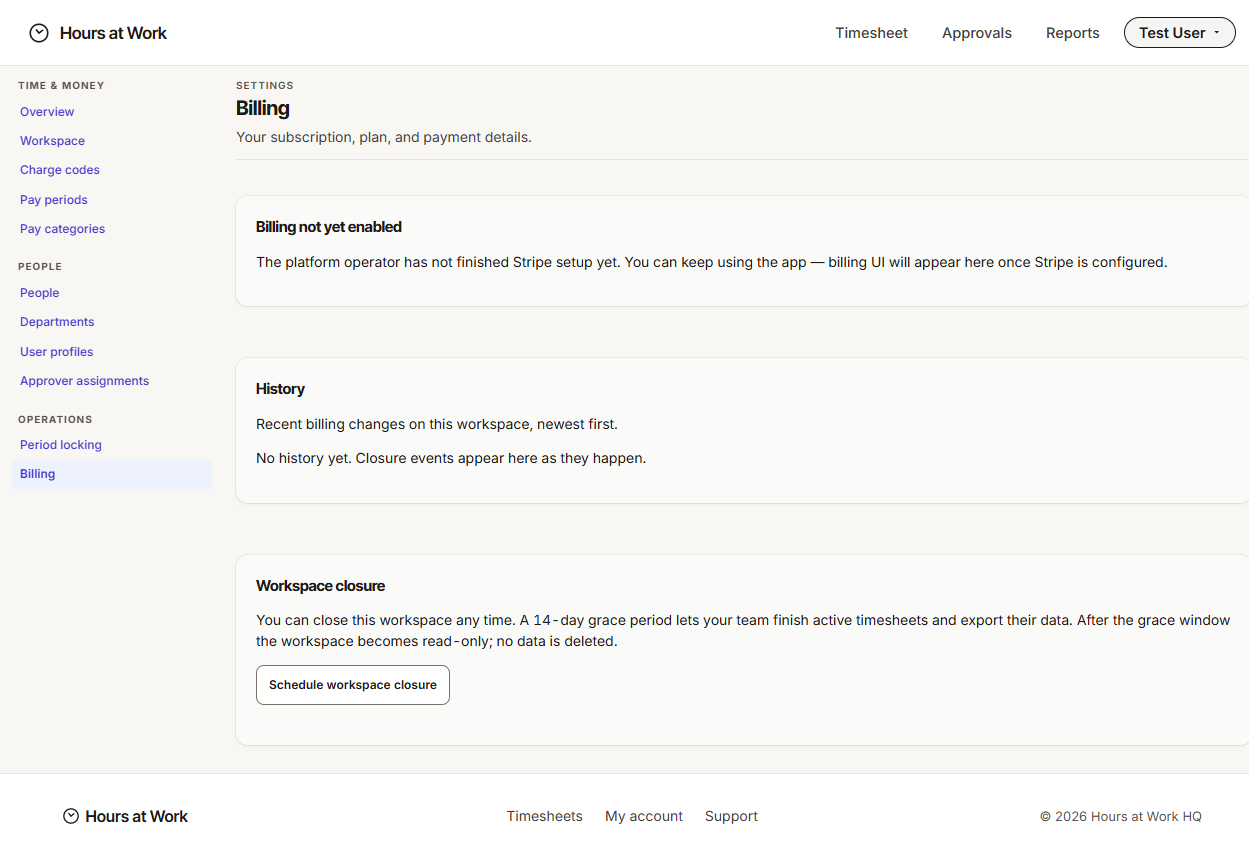
Billing operations — adding seats, updating payment method, downloading invoices — are covered separately at hoursatwork.com/billing-help. If your workspace shows "Subscription lapsed" or "Billing not yet enabled," reach out to Hours at Work support.
Troubleshooting
These are the friction points that come up most often. Handle them once and they stop being scary.
"Staff says they can't submit their timesheet"
Two things to check, in order:
- Approver assignment. Open Settings → Approver assignments. Confirm the person has an active assignment with an effective-from date on or before the week they're trying to submit. If the assignment is missing or only effective from a later date, add or fix it.
- Pay period status. Open Settings → Pay periods. Find the period containing the week in question. If it shows CLOSED, click Reopen.
Why both matter. A timesheet has nowhere to go without an Approver assignment, and it can't be submitted against a closed pay period. Most "I can't submit" reports are one of these two.
"A timesheet I closed needs editing again"
If only one timesheet needs to change, open Settings → Period locking, find the row in Locked timesheets, and click Reopen. Only that one timesheet unlocks.
If several timesheets across a whole period need to change, open Settings → Pay periods and click Reopen on the period row. Every timesheet in that period unlocks.
Why this matters. Reopening is logged in Recent locks, so your audit trail stays intact. Reopen the smallest unit you can — one timesheet beats reopening a whole period.
"I changed the first day of work week mid-week and now staff are confused"
In-progress drafts at the old work-week boundary remain accessible by their original URL — the ‹ Prev and Next › buttons in the timesheet view walk through them. But when staff click This week, they land on a fresh empty timesheet at the new boundary.
The cleanest fix is to flip the setting back, if no new entries have been saved at the new boundary. If entries already exist at the new boundary, leave the setting alone and walk affected staff through the Prev/Next path to find their drafts.
Why this matters. This is one of the only workspace settings where mid-flight changes have lasting side effects. Plan the flip for a quiet moment — ideally before any new draft exists for the affected week.
"A new grant arrived mid-period — can staff backfill?"
Yes. Open Settings → Charge codes → Add charge code, set Kind to Grant, save. The new code appears immediately in the staff grid for the current open week, and staff can log hours against it for any open period.
Why this matters. No data loss, no batch edits. Hours at Work treats charge codes as a live list, not a frozen-at-period-start configuration.
"An approver is out and the queue is piling up"
Open Settings → Approver assignments → Delegations. Set From (the absent Approver), To (the delegate), and the date range. The delegate sees the original Approver's pending queue, and the original Approver's assignments stay untouched.
When the date range ends, the Delegation auto-expires. No manual cleanup.
Why this matters. Delegation beats reassigning every staff member to a temporary Approver. It's reversible by design.
Cross-references
The admin guide ends where the daily workflows of the other roles begin. Useful next reads:
- Staff guide — how staff use the charge codes you've set up.
- Approver guide — what the approver sees in their queue and how signing works. Also covers delegations from the approver's side.
- Fiscal Analyst guide — how Funder and Funder type drive the Funding Reconciliation report and bundle PDFs for funder audits.
- HR Analyst guide — the weekly close, payroll readiness, and how Period locking fits into the HR Analyst's recurring rhythm.
- Glossary — every term Hours at Work uses, with definitions.